VICINITY Neighbourhood Manager
Introduction

VICINITY Neighbourhood Manager is a web-based application that creates a platform for users an their IoT infrastructures with an intuitive visual control. The users can contract added-value services that can access their devices connected to the VICINITY Platform to collect data and control them.
It is divided in two repositories, which are the User Interface and the Server.
In VICINITY Neighbourhood Manager, as in regular social networks, it is possible to establish partnerships with other users and gain read or control access to their devices.
The users can set privacy levels to each device and service they have registered in VICINITY. The privacy levels range from:
- Private – Visible only within the user organisation.
- Visible for friends – Visible also for organisations that were befriended.
- Public - Visible for the whole platform.
In order to register device and service user needs to create so called gateway and set-up VICINITY Gateway and VICINITY Adapter to connect his devices and services to VICINITY Platofrm. To set-up VICINITY Gateway and VICINITY Adapter please consult following repositories:
- VICINITY Agent
- VICINITY Gateway API
- VICINITY Neighbourhood Manager User Interface
- VICINITY Neighbourhood Manager Server
- VICINITY Neighbourhood Manager API specification
VICINITY Neighbourhood Manager is publicly accessible on: https://vicinity.bavenir.eu
Platform deployment
Note
Linux machine. Tested in Debian Jessie and Ubuntu
If you are interested to deploy private instance of VICINITY Neighbourhood Manager please follow the following guideline. In case you just want to make use of the platform please proceed to the next section of the wiki.
Pre-requisites
- Install GIT
- Install NodeJS 8.11.3
- Install Docker
- Install Mongo (Instructions below)
- [OPTIONAL] SSH certificates
Get the application
From your home folder clone the repositories:
git clone https://jalmela@bitbucket.org/bavenir/vicinity_nm_ui.git
git clone https://jalmela@bitbucket.org/bavenir/vicinity_nm_api.git
Run the client
Install Bower
Only first time
sudo npm install -g bower
Run Script
Run the run.sh script with the configuration parameters that suits your infrastructure. See example and options below:
run.sh -s -e dev -p 80 -b {web_url} -q 80 -a {api_url}
-- Examples
-- Production: ./run.sh -s -e prod -a my.server.com:PORT -b my.ui.com
-- Development: ./run.sh -e dev -a localhost:3000 -b localhost:8080
-- Local: ./run.sh [ without arguments, access on localhost:8080 ]
   -h  shows help
   -s  enables ssl [ Without arguments ]
   -e  environment [prod, dev, local (default)]
   -p  web port [8080 (default)]
   -q  api server port [3000 (default)]
   -b  web dns [localhost (default)]
   -a  api dns [localhost (default)]
   -w  workdir [ ~ (default)]
   -n  app name [nm-ui (default)]
Run the server
Build your configuration file
If you are authorized in the GPG chain of the project you can skip this step.
Create a file called vcnt_server.config.js in the same folder as the make.js script.
touch ~/vicinity_nm_api/vcnt_server.config.js
Example of configuration:
module.exports = {
  apps: [{
    name: "vcnt_server",
    script: "./server/bin/www",
    output: './logs/out.log',
    error: './logs/error.log',
    log: './logs/combined.outerr.log',
    merge_logs: true,
    instances: 0,
    watch: false,
    exec_mode: "cluster",
    env_development: {
      NODE_ENV: "development",
      env: "dev",
      PORT: 3000,
      SERVER_JWT_SECRET: ""
      SERVER_SSL_CERT: "/path/certificate/fullchain.pem",
      SERVER_SSL_KEY: "/path/certificate/privkey.pem",
      SERVER_MAX_PAYLOAD: "10mb",
      VCNT_MNGR_DB: "",
      vicinityServicesDir: "/path/additional_services/",
      COMMSERVER_TOKEN: "",
      COMMSERVER_URL: "",
      COMMSERVER_INSECURE: "",
      COMMSERVER_HOST: "",
      COMMSERVER_TIMEOUT_MS: "10000",
      SEMANTIC_REPO_URL: "",
      SEMANTIC_REPO_ADAPTERS:"",
      SEMANTIC_REPO_TIMEOUT_MS : "0",
      SMTP_HOST: "",
      SMTP_USER: "",
      SMTP_PASSWORD: "",
      SMTP_MAIL_SERVER: "",
      SMTP_APPROVER_MAIL: "",
      ELASTIC_APM_USE: "true",
      ELASTIC_APM_SERVICE_NAME: "",
      ELASTIC_APM_SERVER_URL: ""
    },
    env_production: {
      NODE_ENV: "production",
      env: "prod",
      PORT: 3000,
      SERVER_JWT_SECRET: ""
      SERVER_SSL_CERT: "/path/certificate/fullchain.pem",
      SERVER_SSL_KEY: "/path/certificate/privkey.pem",
      SERVER_MAX_PAYLOAD: "10mb",
      VCNT_MNGR_DB: "",
      vicinityServicesDir: "/path/additional_services/",
      COMMSERVER_TOKEN: "",
      COMMSERVER_URL: "",
      COMMSERVER_INSECURE: "",
      COMMSERVER_HOST: "",
      COMMSERVER_TIMEOUT_MS: "10000",
      SEMANTIC_REPO_URL: "",
      SEMANTIC_REPO_ADAPTERS:"",
      SEMANTIC_REPO_TIMEOUT_MS : "0",
      SMTP_HOST: "",
      SMTP_USER: "",
      SMTP_PASSWORD: "",
      SMTP_MAIL_SERVER: "",
      SMTP_APPROVER_MAIL: "",
      ELASTIC_APM_USE: "true",
      ELASTIC_APM_SERVICE_NAME: "",
      ELASTIC_APM_SERVER_URL: ""
    }
  }]
}
Optional fields:
- Work without SSL connection: Skip SERVER_SSL_CERT and SERVER_SSL_KEY.
- Don not use a elastic search monitoring engine: ELASTIC_APM_USE: “false”.
Build the app
make.sh -e <env> -m <Your GPG chain mail [OPTIONAL]>
Flags:
  -h  shows help
Options with argument:
  -n  <app_name> [ vcnt-app (default) ]
  -e  <environment> [ development, production, local (default) ]
  -m  <git_secret_auth_mail> [ If missing, using local config ]
  -w  <path_where_repository_was_cloned> [ ~/vicinity_nm_api (default) ]
Run the app
You can update this script. Follow the instructions in run.sh if you want to make any changes.
Default running configuration is as follows:
run.sh -d <Your domain>
Flags:
    -h  shows help
Options with argument:
    -n  <app_name> [ vcnt-app (default) ] [ OBLIGATORY ]
    -p  <port> [ 3000 (default) ] [ OBLIGATORY ]
    -d  <domain_name> [ OPTIONAL ]
Putting all together – First user and organisation in the app
To start using the web app we need to create the first user manually
Basic set up
- Create dB vicinity_neighbourhood_manager in Mongo
- Create the collections user and useraccounts
Insert first organisation in Mongo – In the useraccount collection
db. useraccounts.insert({
    "name" : "admin",
    "cid" : "admin",
    "businessId" : "00000000",
    "skinColor" : "black",
    "location" : "test",
    "status" : "active"
})
Find organisation and copy the Mongo Id
- db.useraccounts.find({organisation: organisationName}).pretty()
Insert first user – In the user collection
  db.users.insert({
    "email" : "admin@admin.com",
    "occupation" : "admin",
    "name" : "admin",
    "location" : "test",
    "authentication" : {
        "hash" : REQUEST FIRST PASSWORD TO BAVENIR,
        "principalRoles" : [
            "user",
            "devOps",
            "administrator"
        ]
    },
    "accessLevel" : 1,
    "cid" : {
        "id" : < organisation MongoId >,
        "extid" : "admin"
    },
    "status" : "active"
  }
})
Add your new user to the organisation
- db.useraccounts.update({‘organisation’: organisationName},{‘accountOf’: { $push:{‘id’: < user MongoId >, ‘extid’: “admin@admin.com” }}})
Try to log in
- Navigate your browser to the app domain and use the mail and password to do the first log in.
Additional info
Install Mongo with Docker
You can use docker_compose to run the backend with an instance of Mongo. Docker_compose.yml example:
version: "3.1"
services:
  mongodb:
    networks:
    - dockernet
    image: mongo:latest
    container_name: mongodb
    restart: always
    environment:
    - MONGO_DATA_DIR=/data/db
    - MONGO_LOG_DIR=/data/log
    volumes:
    - ~/docker_data/db:/data/db
    - ~/docker_data/logs/mongo:/data/log/
    ports:
    - 27018:27018
    command: mongod --smallfiles --logpath /data/log/mongodb.log
  vas-monitor:
    networks:
    - dockernet
    volumes:
    - ~/docker_data/logs/vas-logs:/app/logs
    container_name: vcnt-app
    ports:
    - 3001:3001
    image: vcnt-app
    depends_on:
    - mongodb
networks:
    dockernet:
        driver: bridge
You need to create the dockernet network
docker network create -d bridge --subnet 192.168.0.0/24 --gateway 192.168.0.1 dockernet
Install Mongo for debian
- Import they key for the official MongoDB repository.
sudo apt-key adv --keyserver hkp://keyserver.ubuntu.com:80 --recv 0C49F3730359A14518585931BC711F9BA15703C6
- After successfully importing the key, you will see:
Output
gpg: Total number processed: 1
gpg:               imported: 1  (RSA: 1)
Next, we have to add the MongoDB repository details so apt will know where to download the packages from. Issue the following command to create a list file for MongoDB.
- WARNING: It may change depending on the Linux distribution
- echo “deb http://repo.mongodb.org/apt/debian jessie/mongodb-org/3.4 main” | sudo tee /etc/apt/sources.list.d/mongodb-org-3.4.list
After adding the repository details, update the packages list and install the MongoDB package.
sudo apt-get update
sudo apt-get install -y mongodb-org
- Create target folders for mongo and give permissions to the mongo user on that folders.
mkdir /data/db
chown -R mongodb:mongodb /data/db
chown -R mongodb:mongodb /var/lib/mongodb
- Set paths in configuration file (/etc/mongod.conf) to:
- Storage –> dbPath: /data/db
- SystemLog –> path: /var/log/mongodb/mongod.log
Note
See at the end how to add users to MONGO if you want to use authorization for security
Note
BE CAREFUL WITH THE SPACES – YAML FORMAT
- Once MongoDB installs, start the service, and ensure it starts when your server reboots:
sudo systemctl enable mongod.service
sudo systemctl start mongod
sudo systemctl status mongod  (Check it runs properly)
Add authentication to MONGO
Create admin user
- mongo
- Now in mongo CLI…
> use admin
- Create admin …
> db.createUser({
   user: "name",
   pwd: "pwd",
   roles : [{
        role : "userAdminAnyDatabase",
        db : "admin"
   }]
})
- Close the CLI…
> quit()
- mongo -u [user] -p [pwd] –authenticationDatabase “admin”
- Again in the CLI
> use vicinity_neighbourhood_manager
- Create user …
> db.createUser({
   user: "name",
   pwd: "pwd",
   roles : [{
        role : "readWrite",
        db : "vicinity_neighbourhood_manager"
     }]
  })
- Close CLI
- vim /etc/mongod.conf
- Add or uncomment
security
  authorization: 'enabled'
- Save file
- sudo service mongod restart
- Remember to update /etc/init.d/vcnt_server with the new MONGO connection string with authentication. Just uncomment and complete the URL that has user and password
Platform Introduction
This section introduces the platform to new users. It goes through the UI presenting the basic actions and also explains how the app parts interact.
Architecture
In this section it is explained the structure of the web application. All the entities or building blocks that conform the app are presented individually and in relation to the others.
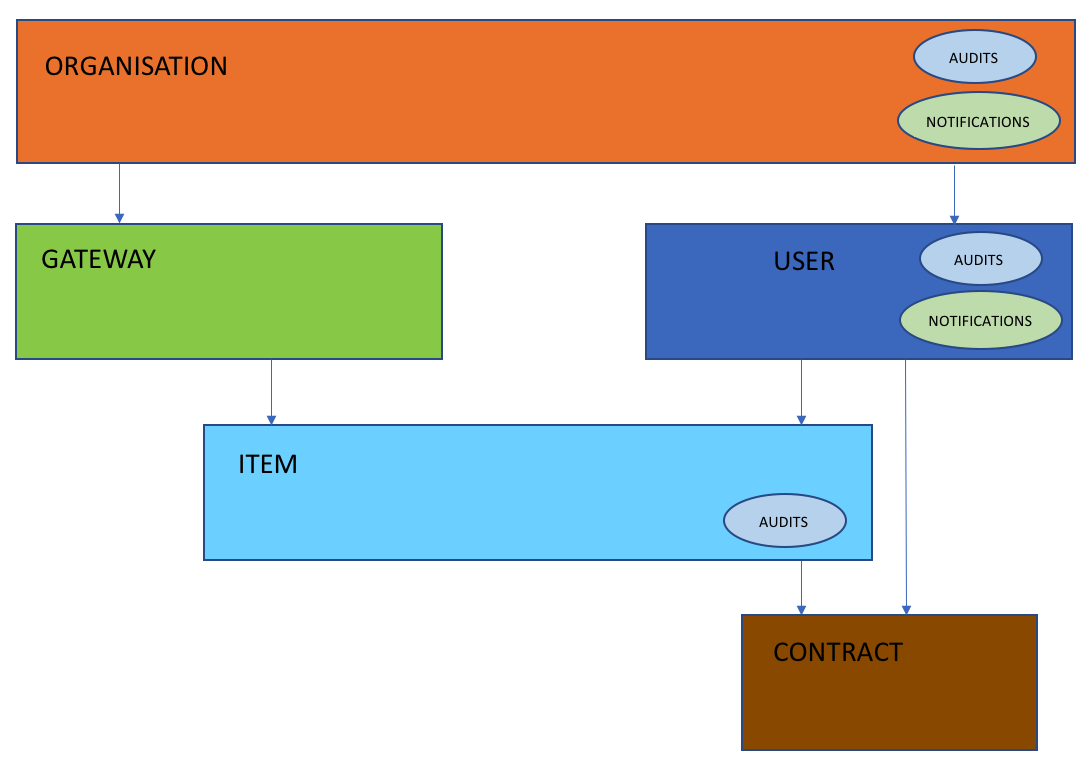
The backbone entities are 5, listed in order of importance below:
- Organisation: This is any company or association that own a smart energy facility and it is registered in the platform. An organisation can have many users and gateways underneath.
- User: These are actors, members of an organisation, that have a profile in the platform. Users can play different roles:
- Device owner
- Service provider
- Infrastructure operator
- Administrator
- System integrator
- User
- Gateway: It is an entity that represents a Gateway/Adapter. Adapters integrate a IoT infrastructure that contain one or more devices/services. In the platform, each adapter registers its own infrastructure.
- Item: It represents all devices and services.
- Contract: Every time an organisation requests to use a third party service for its devices, it is necessary to establish a contract between them. This entity stores the legal text, the ids of the parties involved and other relevant information to ensure a correct exchange of data.
To complement the social features of the platform there are other 2 entities for the notifications and the audit logs (History).
The relation between entities can be seen in the following picture:
Platform Overview
This section covers the appearance of the web application, we will go through the main views and provide a general description. The objective is to just to give some orientation to the future users, in the following sections we will drill down into each part of the web.
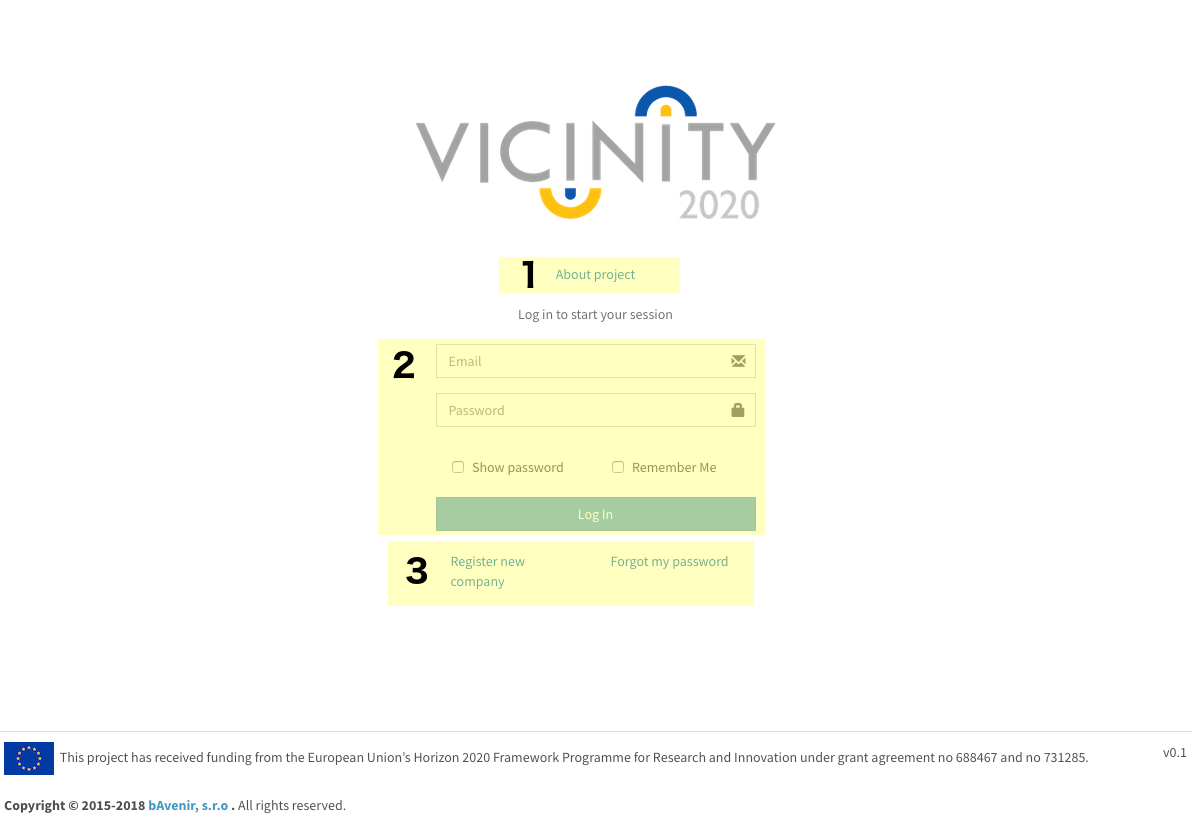
Login
After providing a valid mail and password it will log you in the web app.
- Link to the Vicinity project site.
- Login area. You have the option to see your password and to remember the login information in your browser.
- Changes the view to registration of a new organisation or to recover your password.
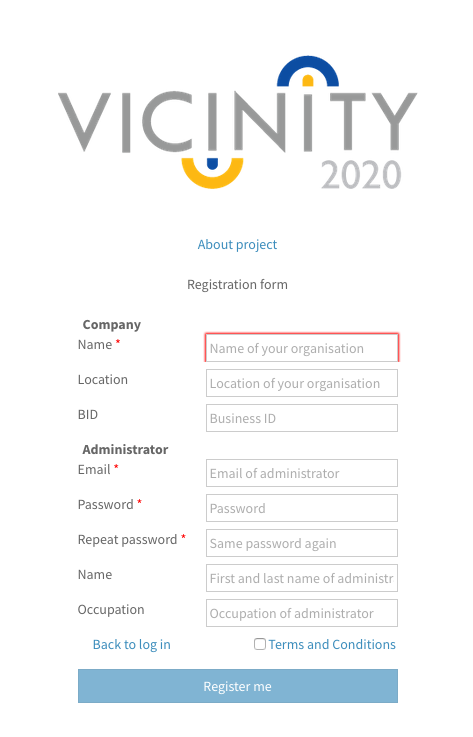
Registration
Here you can register a new organisation. After filling all the boxes, you will need to wait until the webmaster approves your request. Then you will receive a mail to validate the registration. Shares the navigation options and the background with the login.
Note
All fields are mandatory.
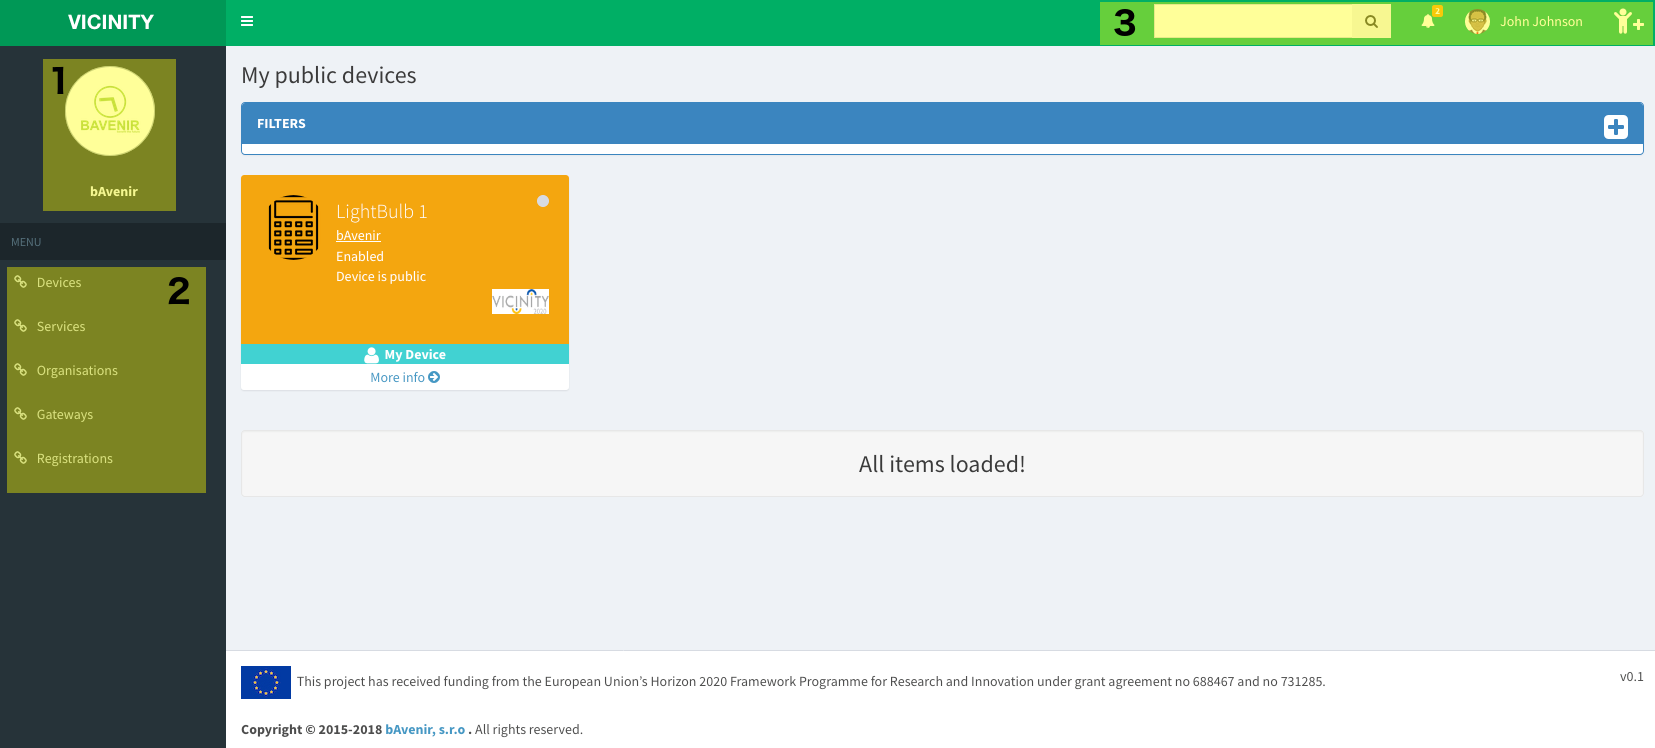
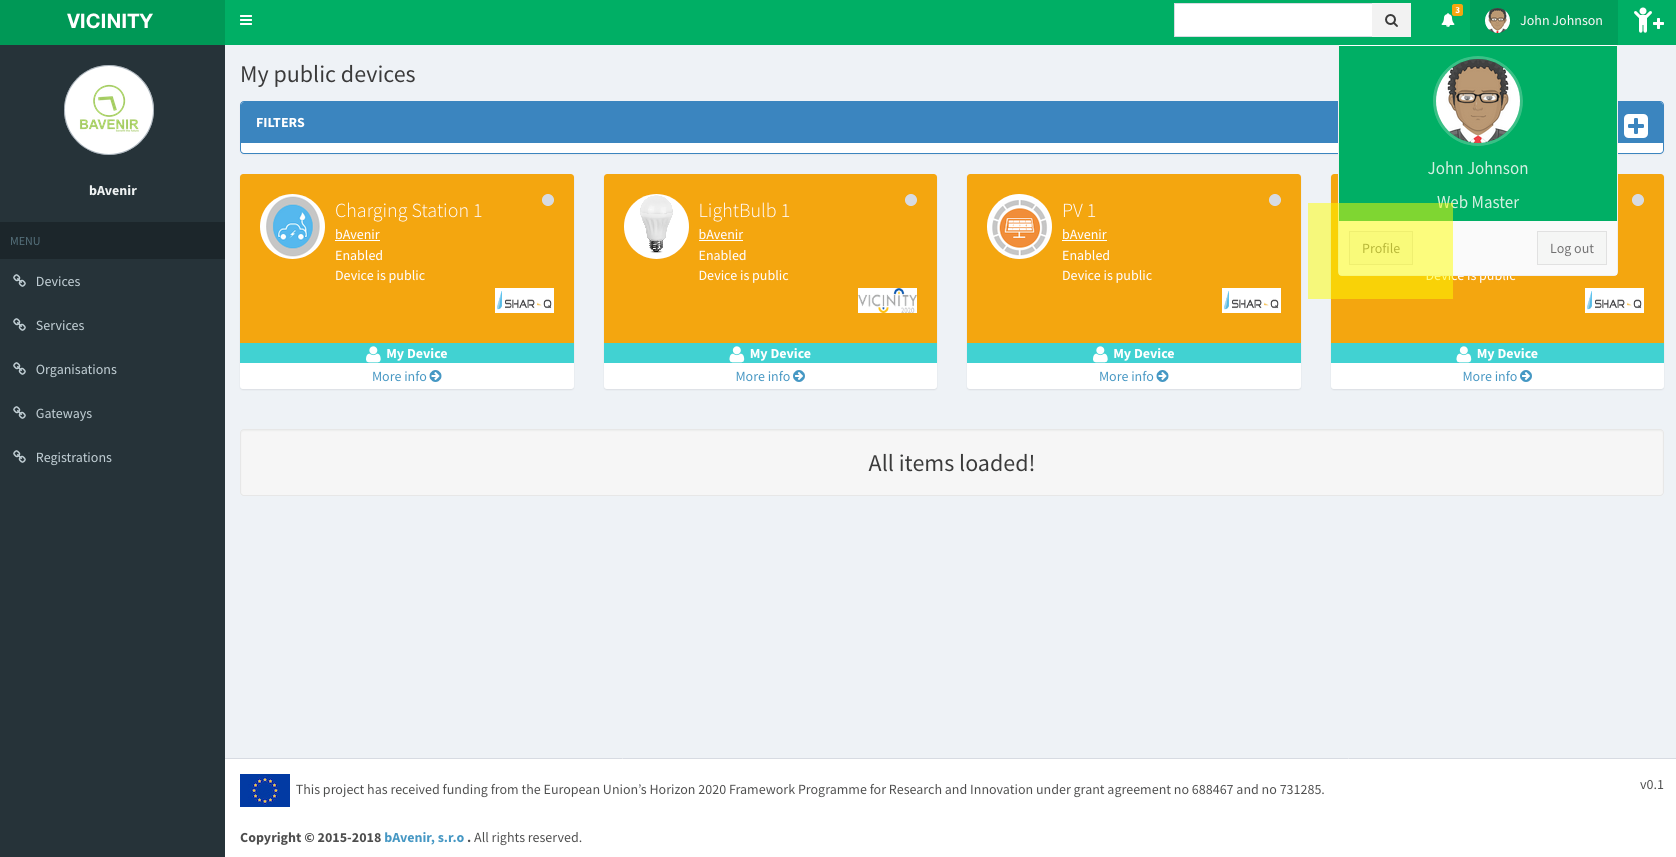
Home
Main app view. The central part will show the current selection, being the default view your devices.
- Link to your company profile.
- Navigation menu: You can switch here between the different parts of your infrastructure like devices, services and also other organisations in your neighbourhood. Other options like gateways, registration requests and contracts will be available or not depending on your user roles.
- Top menu: Here you can perform a search by name in the whole neighbourhood, see your notifications, see your user profile and invite other users and organisations to the platform.
Quick Start
This section contains the first steps that any new user should follow to start working with the platform. The objective is to provide some guidance to non-experienced users of the platform that want to have a quick functional set-up.
Pre-requisites
- You have successfully registered a new organisation.
First login
- The first time you login, your organisation has only one user with the administrator role. There are no access points, devices or services available at this point.
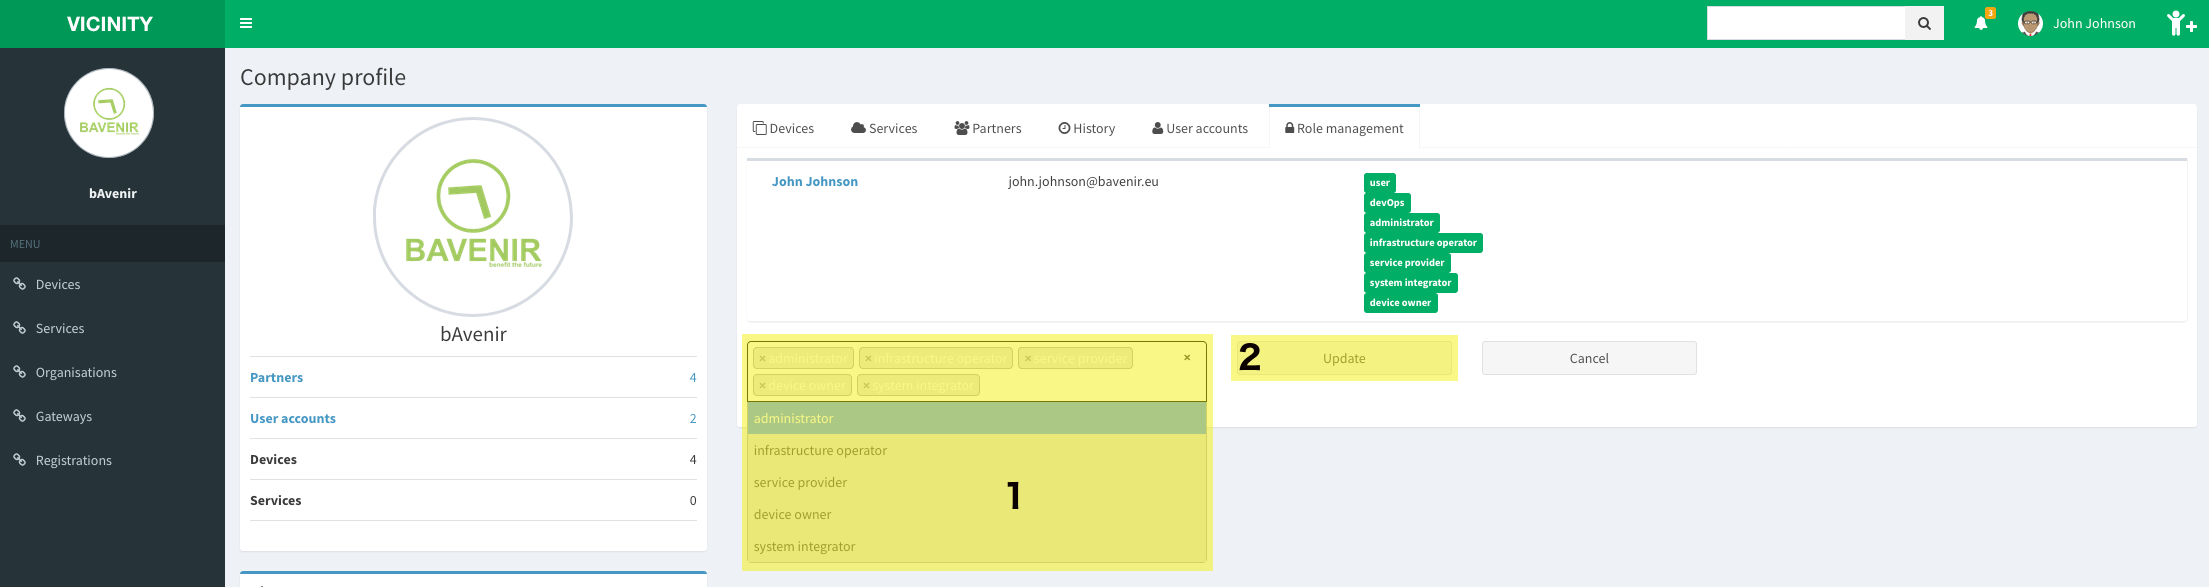
- Go to the organisation profile and give new roles to your user. For simplicity, grant all the roles and you will get full power over your organisation. It is possible to have different users having different roles and responsibilities, to learn more go to the user properties section.
- As an optional step, making your user visible to others in the platform is a good idea. The reason is that in future steps it will be necessary for making devices and services visible in the platform.
- Log-out and log-in again, so the change of roles will take effect.
Create an access point
- In order to be able to register devices and services, it is necessary to have access credentials for your agent/adapter. This is what we call access point in the platform.
Next steps
- Congratulations, your account is ready to register devices and/or services. If you have not done so yet, install the agent/adapter and a gateway so your infrastructure can communicate with the platform. The access point credentials will be necessary to register your agent and afterwards, for registering devices and services.
- For more info:
Registration
This section covers the possible ways to register an organisation or a user in the platform. In general it is possible to proactively request access, that would require to wait upon validation from the platform admin, or to be invited by an already existing organisation.
Register an organisation
This is the basic registration for new organisations interested in joining the IoT platform. It requires to follow some steps that are described below:
- Select “Register new company” in the login page.
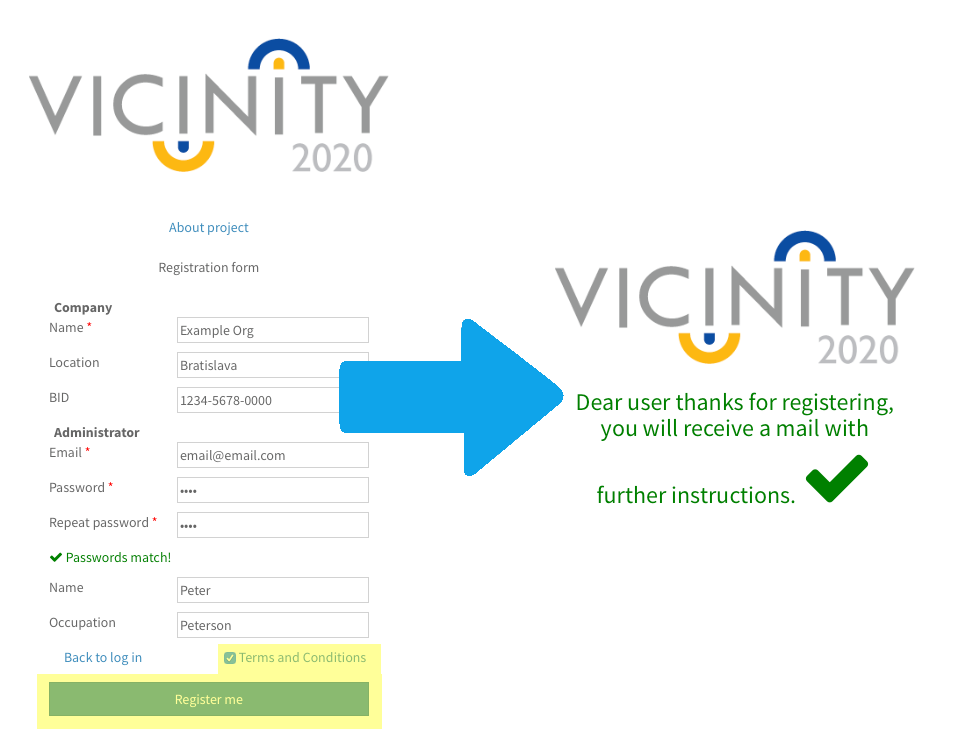
- The platform administrator will receive your request and validate it.
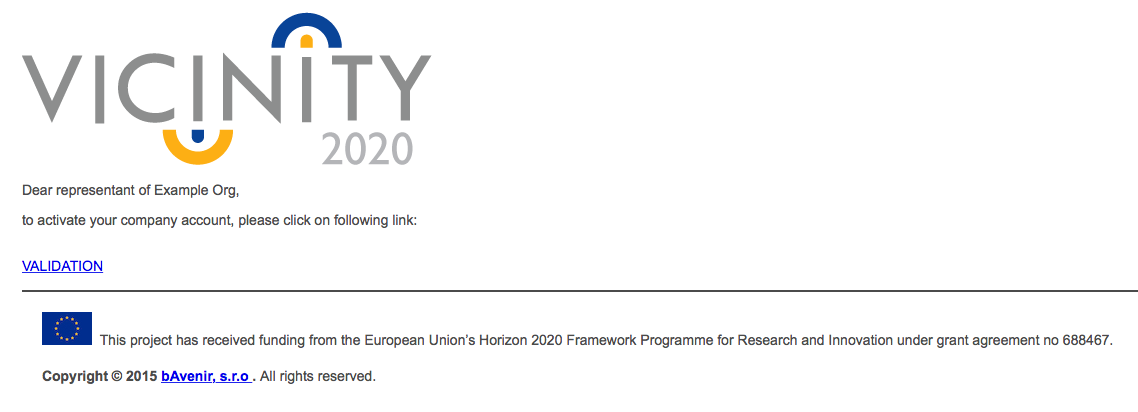
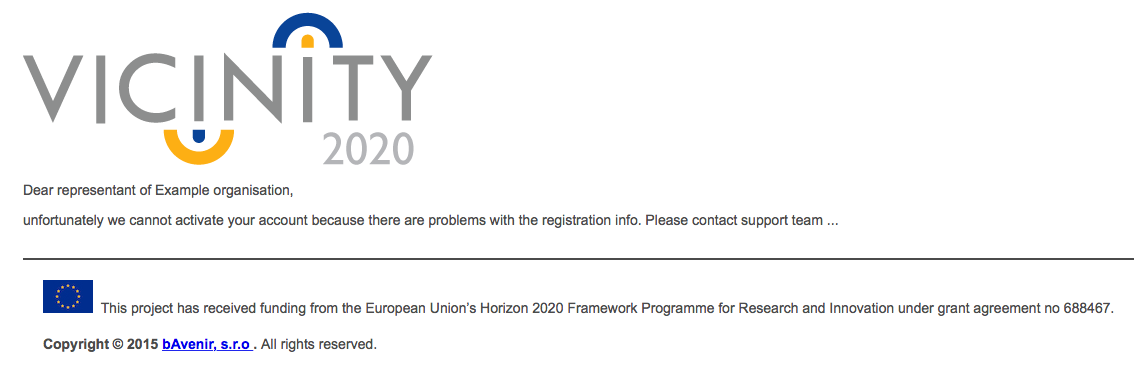
- You will receive a mail stating whether your request was accepted or rejected. If accepted you need to click the validate button.
- Accept
- Reject
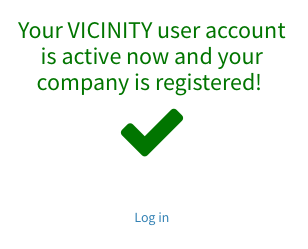
- You will be navigated to the browser and prompted with a success message. Press login and enjoy using the platform!
Invite an organisation or user
Quick registration for API developers
In order to use this option of registering organisations, the interested user needs to request “superUser” role to the platform admin. Once granted, this API endpoint offers an way to program the registration of new organisations, speeding up the process.
Organisation and user management
This section is focus on the organisations and user. First their properties will be shown and explained, to then show what is possible to update and manage using the UI.
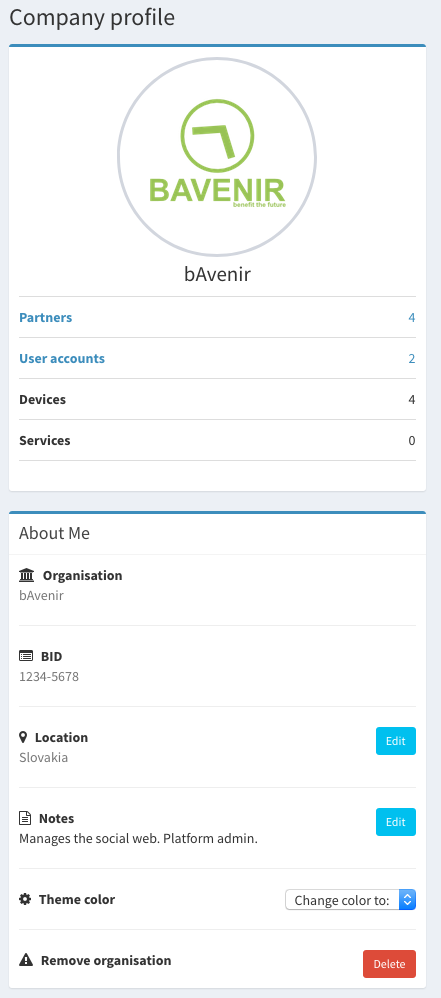
Organisation properties
The organisation is the main entity in the platform. Under the organisation there can be registered several users and gateways. Everything in the in the platform has to belong to an organisation.
To characterise an organisation there is a series of properties and relationships.
Properties
| Property | Description | Update |
| Name | Organisation name | NO |
| CID | External ID | NO |
| BID* | Business ID | NO |
| Avatar | Organisation logo | YES |
| Location | Country or city | YES |
| Notes | Information about the organisation | YES |
| Skin color | Account app colour | YES |
Note
If your organisation/association lacks BID or your are a legal person you might choose a random number or string.
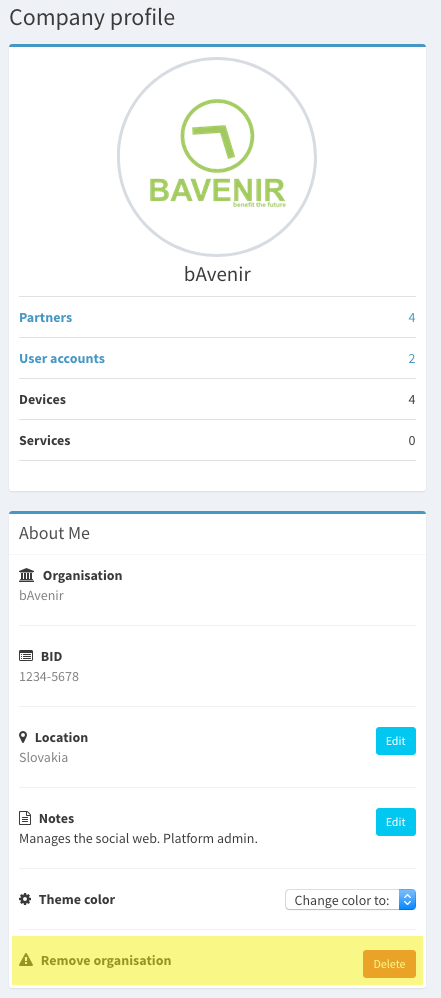
Some of the properties can be modified/updated. To do so navigate to the organisation profile and update them using the edit buttons. The avatar can be updated by clicking over it. Note that _in order to update the organisation profile you need to have the administrator role._
Relationships
The organisation is linked to other entities as previously mentioned.
| Relation | Description |
| Gateways | All the infrastructures registered under the organisation |
| Users | All the users registered under the organisation |
| Partners | Other organisations that agreed to be partners |
| Notifications | Some actions trigger notifications that are sent to the whole organisation |
| Audits | Keeps track of relevant events for the organisation (History) |
To visually see all these relationships in the UI is very easy, see below how:
- Partners, audits and users: Directly in the organisation profile.
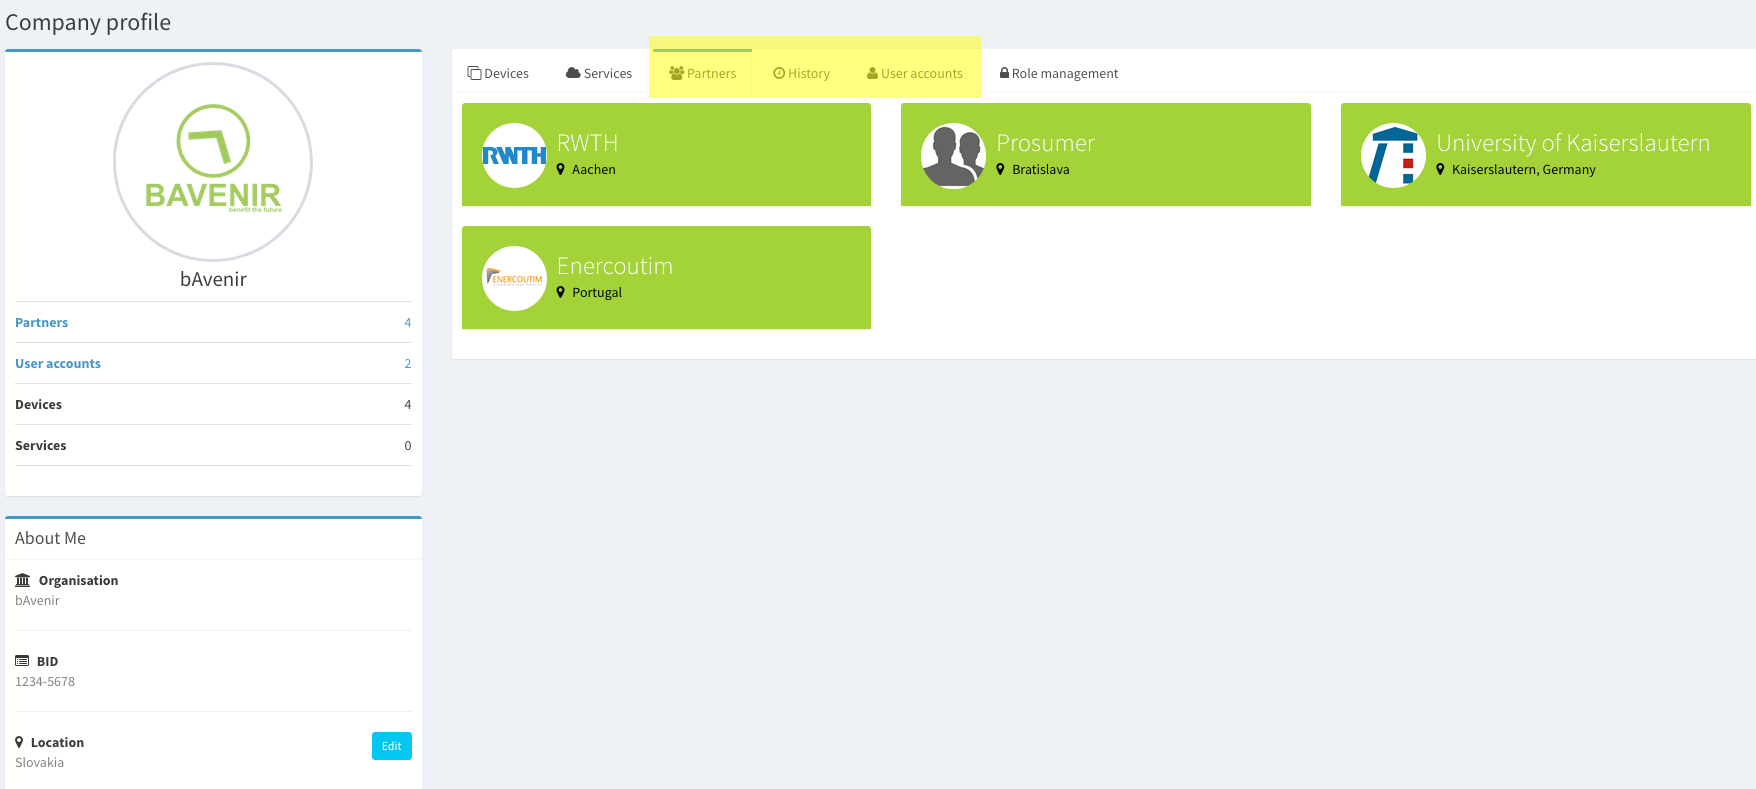
- Gateways: In the side menu there is a tab dedicated to them. You need to be system integrator to see this menu.

- Notifications: The bell on the top menu shows all notifications addressed to the organisation.

User properties and roles
This section covers all user properties and relations to other entities. It will deal separately with the roles, since it is the most complex part of a user. An organisation can have many users, and each of them can play one or several roles. Managing infrastructures, services or the organisation account are some of the tasks.
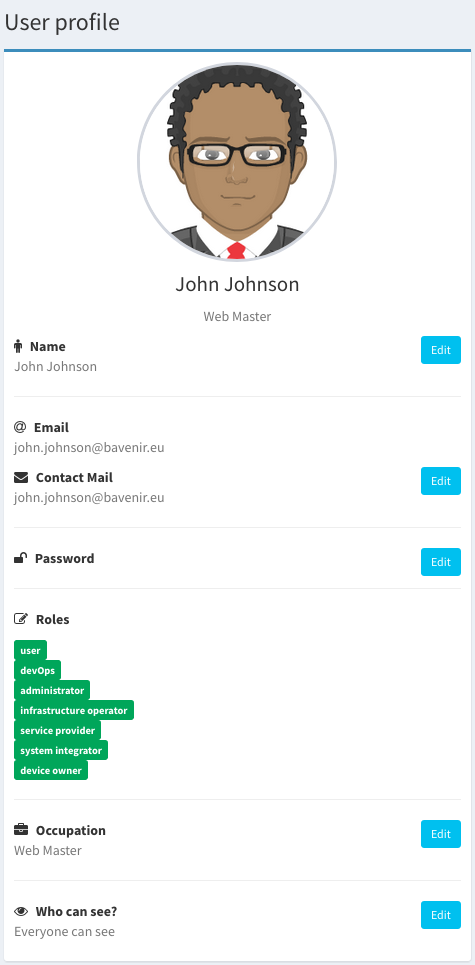
Properties
| Property | Description | Update |
| Name | User name | NO |
| Registration mail and external ID | NO | |
| Contact Mail | E-mail address to contact user after registration | YES |
| Avatar | User logo | YES |
| Password | Credentials to log in the platform | YES |
| Occupation | Information about the organisation | YES |
| Visibility* | Who can see the user in the platform | YES |
Note
The visibility of the user has to be always higher than the visibility of its devices and services. Therefore if there is an attempt to give a device public visibility while the user is private or only visible to friends, there will be a warning notification stating the issue.
Some of the properties can be modified/updated. To do so navigate to the user profile and update them using the edit buttons. The avatar can be updated by clicking over it.
Note
Note that only a user can update its own properties. An exception to this rule are the roles, which will be explained in the next section.
Relationships
The user is linked to other entities as previously mentioned.
| Relation | Description |
|---|---|
| Items | All the devices and services managed by the user |
| Contracts | Agreements to share data where the user participates |
| Notifications | Some actions trigger notifications that are sent to a single user |
| Audits | Keeps track of relevant events for the user (History) |
To visually see all these relationships in the UI is very easy, see below how:
- Items, audits and contracts: Directly in the user profile.
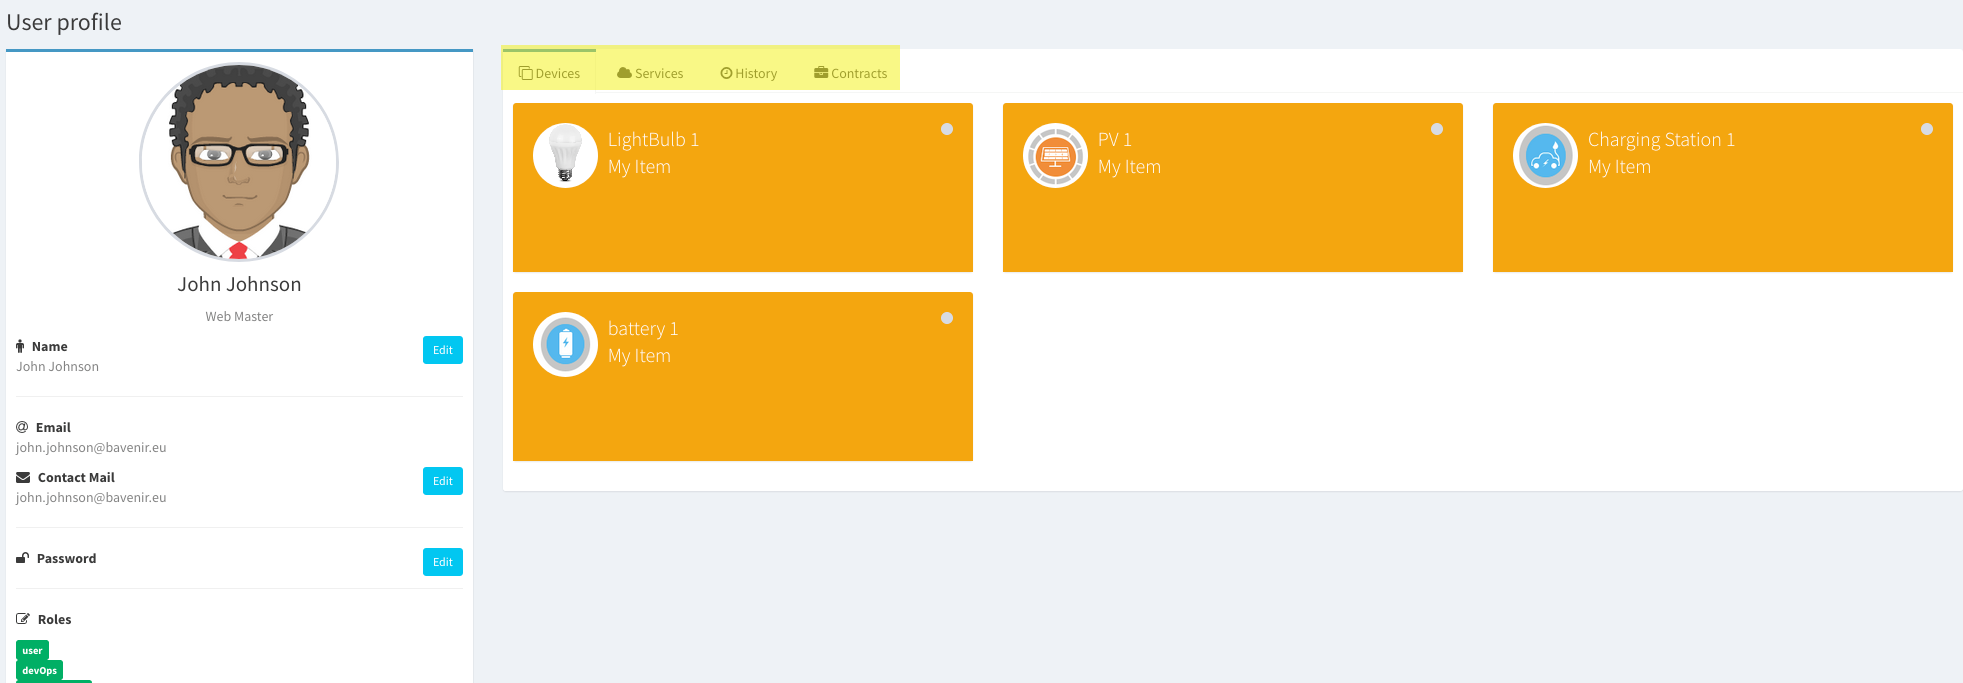
- Notifications: The bell on the top menu shows all notifications addressed to the user.

Roles
There are 6 user roles in the platform:
- User: All users have this role by default
- Administrator: The user that registers an organisation gets this role by default. It can be also granted to other users afterwards. It is necessary to be administrator in order to:
- Modify organisation properties
- Remove and organisation
- Update users roles
- Device owner: A user with this role can enable devices. When enabling a device, the user becomes its responsible platform-wise and it can manage its properties and share its data.
- Service provider: A user with this role can enable services. When enabling a service, the user becomes its responsible platform-wise and it can manage its properties and share its data.
- System integrator: A user that can manage the gateways (agents/adapters) of the platform. Can create, update and remove gateways.
- Infrastructure operator: A user that can initiate contracts. In other words the responsible to choose which service can adequate to some of the devices of its organisation and request it.
The infrastructure operator can be the owner of devices or not (having the role of device owner). In case the devices chosen to be part of a contract do not belong to the infrastructure operator, the actual owners will be asked for permission. The contract will be completed only with those devices whose owners agreed. Additionally there is a role granted by the platform administrator: * superUser: This role is reserved for developers interested in using the API. With this role, it is possible to use a faster registration method.
Organisation management
Besides updating properties there are some other aspects of an organisation that can be managed:
Organisations view
It is one of the tabs in the sidebar menu. It allows to see which organisations exist in the platform and to filter them by friends and not friends.
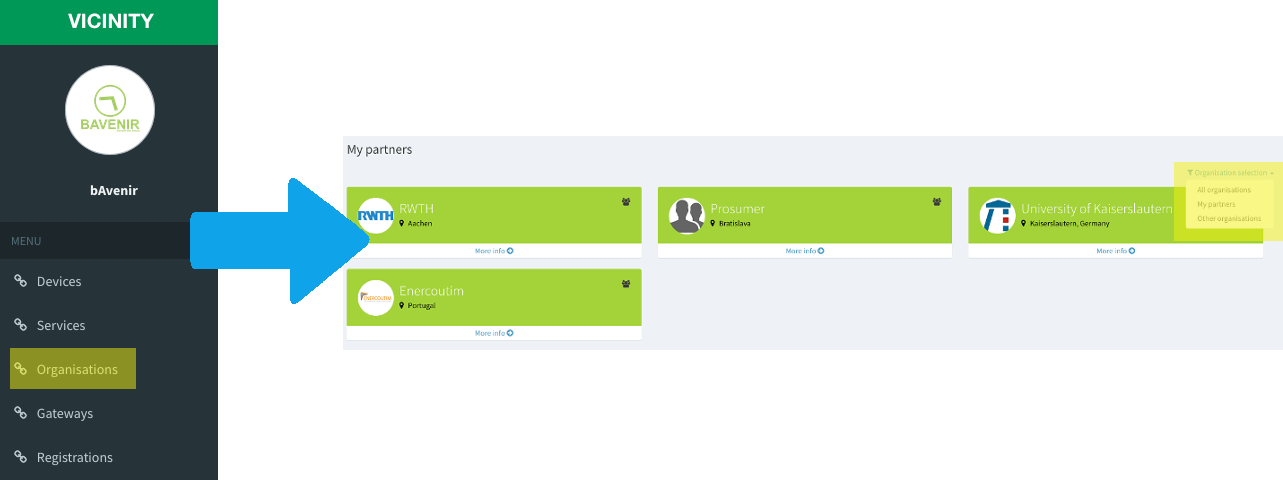
Friendships
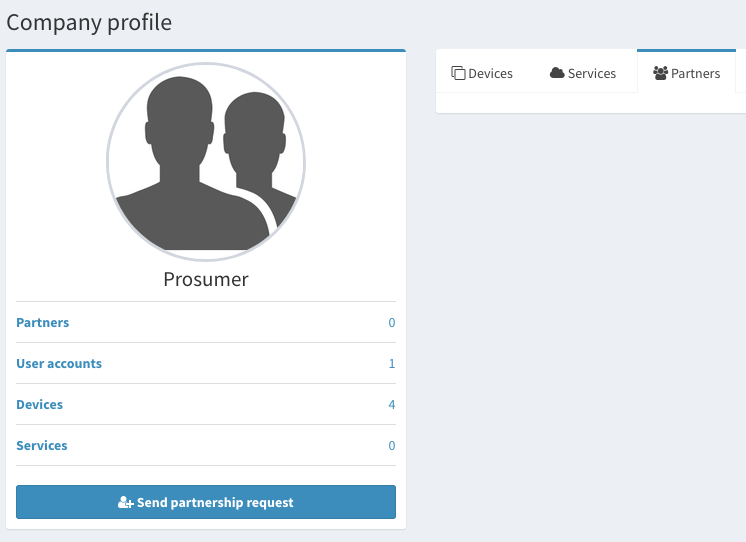
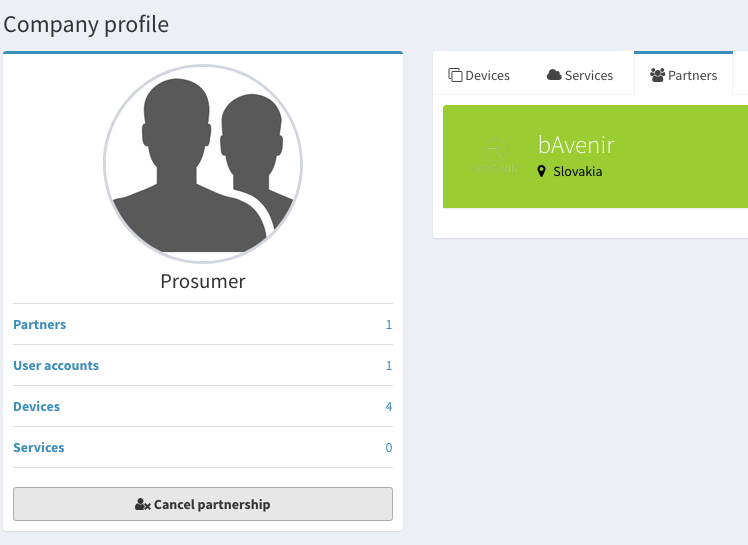
Any user can request to establish a friendship between its organisation and any other. There are 5 possible actions during the partnership process. All of them can be performed from the profile of the potential friend.
- Request partnership
You are initiating the partnership process
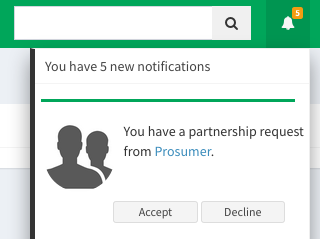
- Manage partnership
You receive a partnership request. You can see if you have requests in the notifications area.
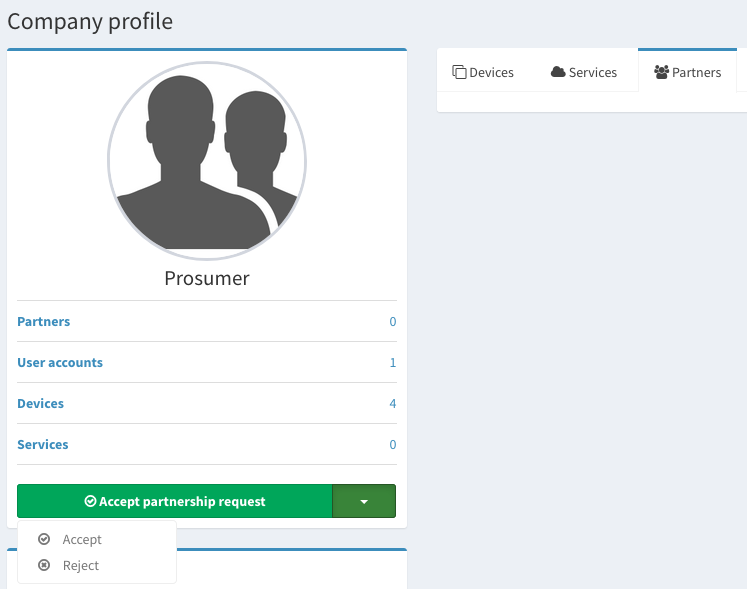
Also possible to manage the request from the notifications.
- Cancel partnership
You decide to stop a partnership. The other party will receive a notification.
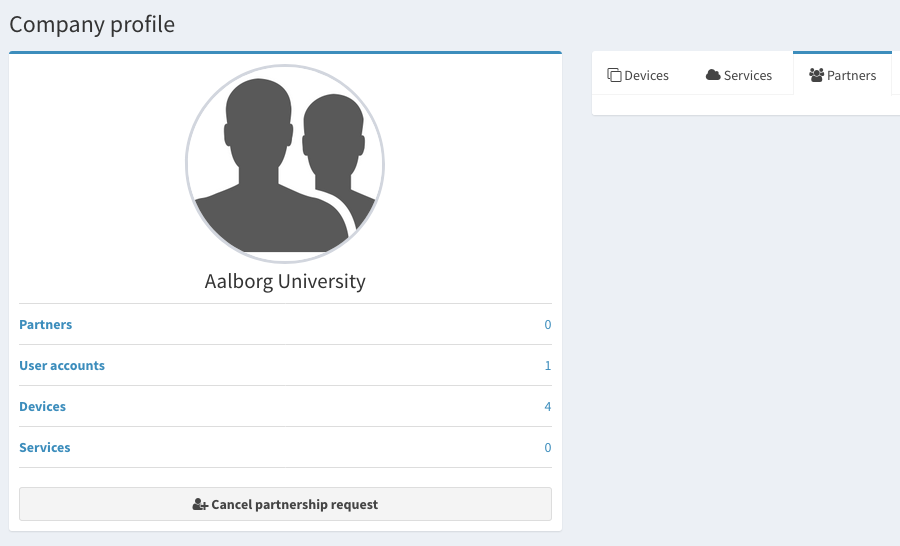
- Cancel partnership request
You decide to stop a partnership request.
Remove organisation
Users with the administrator role can proceed to remove an organisation from the organisation profile.
User management
An administrator has certain control over its organisation users. As of now, an administrator can remove or change the roles of a user.
Note
Important notes regarding change of roles and user removal: The rules below apply both the case that we want to remove a user or just change a role.
There must be in all moments at least one organisation administrator.
There are some roles that cannot be removed if the user is still bound to some of its responsibilities, i.e:
- A device owner cannot be removed until the user does not have any devices under its responsibility. The devices can be either deleted, disabled or moved to another user.
- A service provider cannot be removed until the user does not have any services under its responsibility. The services can be either deleted, disabled or moved to another user.
- A infrastructure operator cannot be removed until all contracts it is responsible for are either moved to other infrastructure operator or cancelled.
Remove user
It is possible to remove users from the organisation profile, under the tab role management.
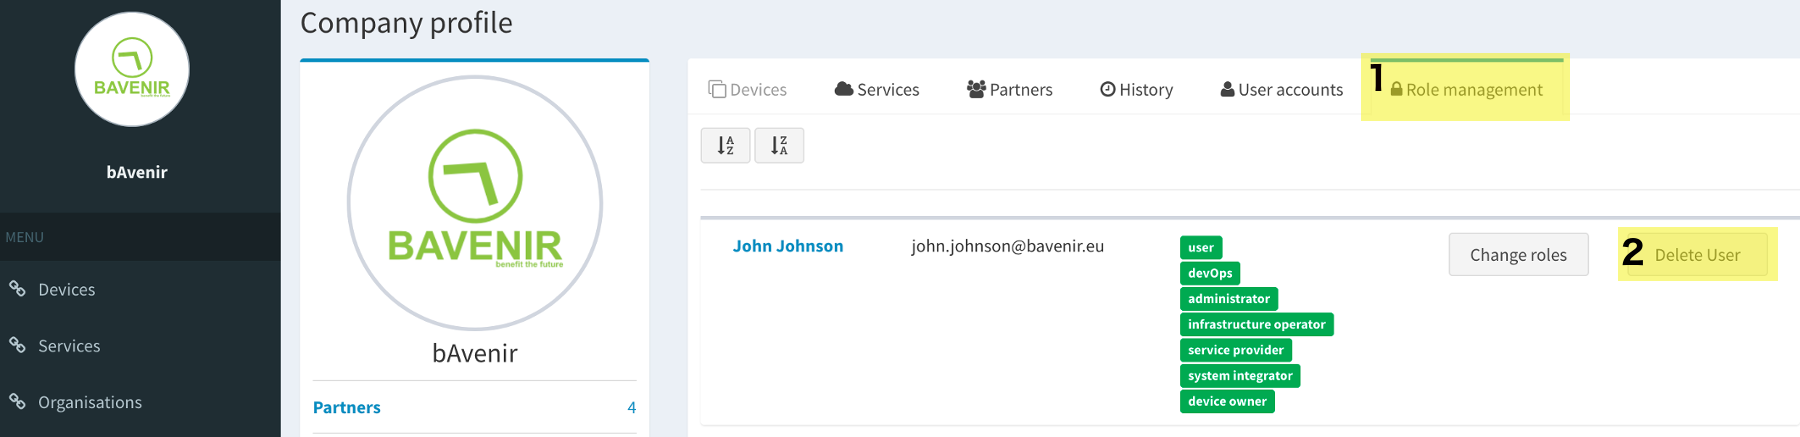
Change roles
As mentioned, only administrators can add/remove roles. Otherwise the process is simple and it is located under the organisation profile.

Note
In order for the changes to take effect, the user that had its roles changed might need to log in again.
Infrastructure Management
This section is focused on the infrastructure level. The properties and main features of the infrastructure entities will be explained in the following subsections.
Access Points
This section is about the Access Points, which are the virtual representation of an infrastructure. In a real scenario, an access point represents 2 or 3 components:
- Gateway: Software that is used to communicate with the platform’s communication server and the P2P network. See all information regarding the VICINITY Open Gateway HERE
- Agent: [OPTIONAL] It is used to register the smart components of an infrastructure into the platform. It implements logic to handle the process of registering, updating and removing items from/to the platform. It needs to have the infrastructure components described in a common format. See all information regarding the VICINITY agent HERE
- Adapter: It is the specific software that translates the infrastructure conventions, definitions or API endpoints into the common format. It is mapping all the properties and capabilities of each smart component so the platform can understand what it is. It could implement some of the agent functionalities depending on the needs.
To be able to manage the access points in the platform, a user needs to have the system integrator role. Having this role opens the access point view in the sidebar,
and from this view it is possible to manage all the access points. The image below is going to be referenced in the following sub-sections to describe all its details.

Example figure
Properties
As we can see in the example figure there are 3 main properties.
| Property | Description | Update |
|---|---|---|
| Name | Friendly name | YES |
| AGID* | External ID | NO |
| Type | Indicates to which project belongs the infrastructure | YES |
Note
This is an important field because when initialising the agent/adapter, this ID will be used in the authentication credentials together with the password. The password will be introduced by the system integrator when creating the gateway entity and will not be stored by the web application.
Relationships
The access point belongs to an organisation and at the same time can have several items (devices and services).
| Relation | Description |
|---|---|
| Items | All the smart components and services |
In the example picture it is possible to see the count of items for each infrastructure, in addition, each item has in the profile the name and AGID of its agent/adapter. For system integrators using the Open Gateway API there are calls that return all items registered under the agent/adapter among other interesting options.
Manage
Here we will focus on the highlighted area of the example picture. Those are the actions that can be done over the infrastructure.
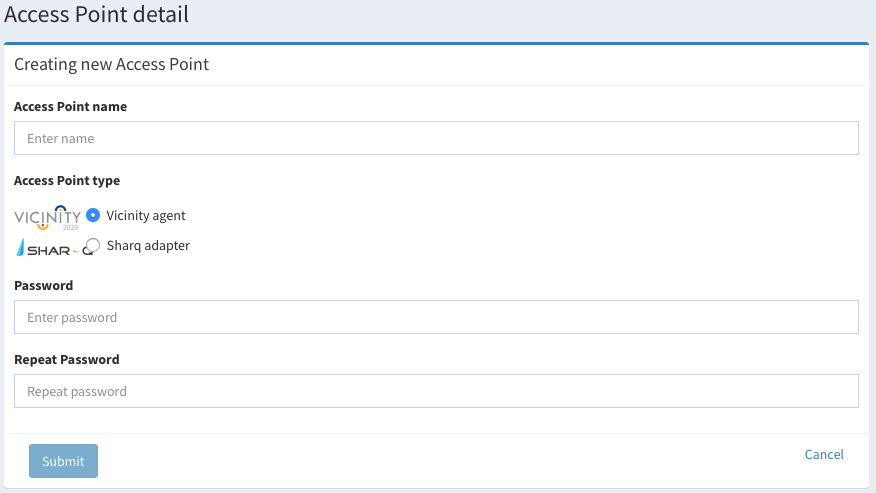
- In the first place there is creating a new access point. The process is simple just follow these steps:
- Add a name
- Select a type
- Give a password
- Submit the form
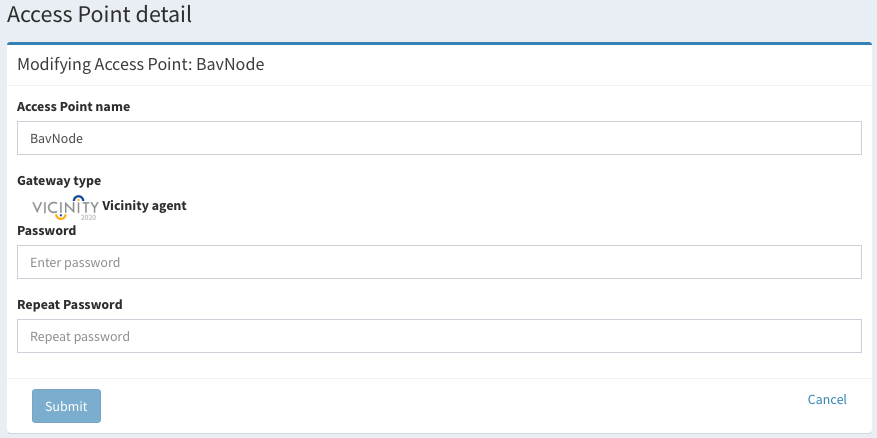
- In the second place, there is a view/modify option. When clicking a new view opens with the access point detail:
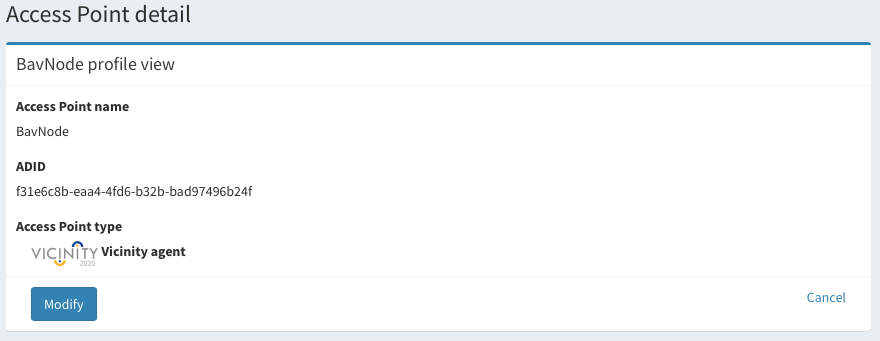
If we click over modify the view changes and it is possible to update the name and password of the access point.
- At last, it is possible to remove a access point from the platform. This means that the platform will forget your infrastructure.
Items
This section describes the item entity. In a real infrastructure, an item can be a smart device or a value-added service.
All the items need an adapter/agent and a gateway to be integrated in the platform. Once registered, users with service provider or device owner roles will be responsible for the services and devices respectively.
Properties
In the table is possible to see the most relevant properties, for those which are possible to update there will be a separate sub-section in the last section of this page (“Manage”).
| Property | Description | Update |
|---|---|---|
| Name | Friendly name | NO |
| OID | External ID | NO |
| Type | Indicates if it is a service or device | NO |
| Visibility | Private, for friends, public | YES |
| Info* | Thing description of the item | YES |
| Avatar** | Item logo | YES |
| Status | Enabled/Disabled | YES |
* It can only be updated with the adapter/agent ** Can be updated clicking over it and selecting a new picture from the folder
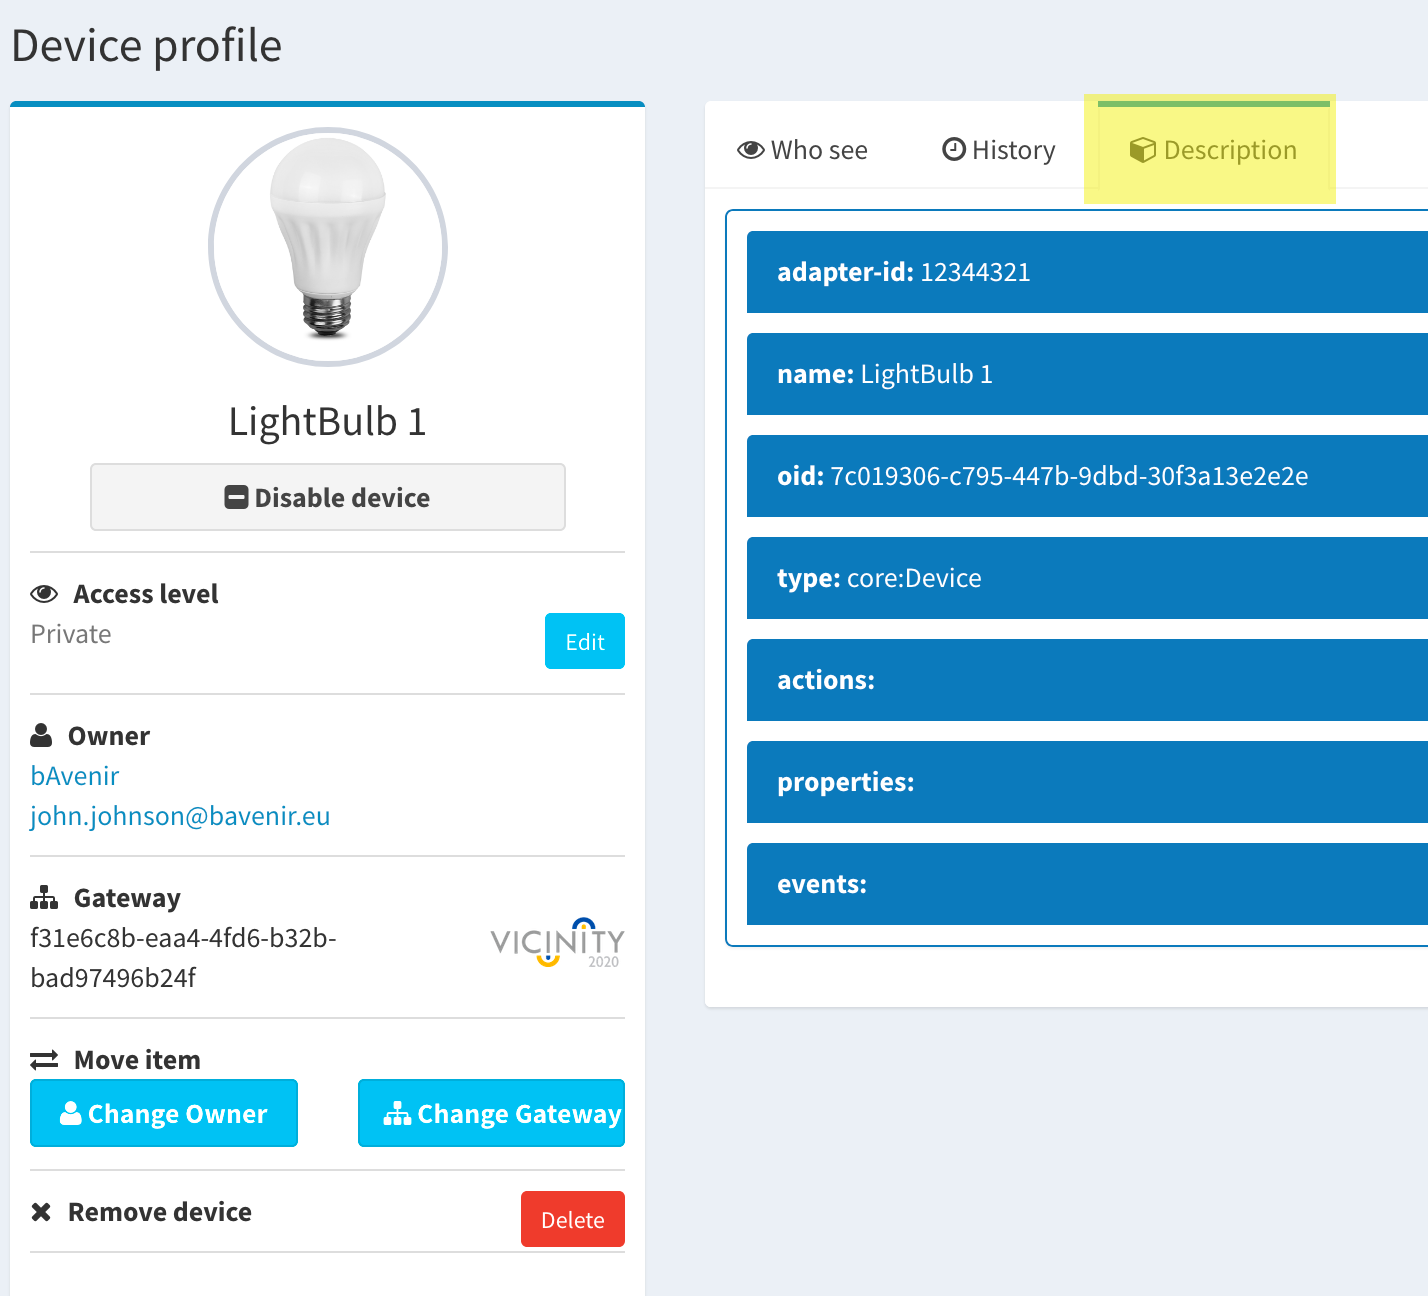
Note
Info property: Thing description of the item In the item profile, there is a tab call “Description” that shows a series of collapsible tiles containing all the properties that define the Thing Description of the item. We can find there all the available properties and actions for the given item. This properties, actions and events are the same that can be requested using the consumption endpoints of the Open Gateway API
Relationships
The items belong to a gateway and to a user. It can have contracts and audits.
| Relation | Description |
|---|---|
| Contracts | Agreement to share device data |
| Audits | Most relevant events of the item (History) |
Manage
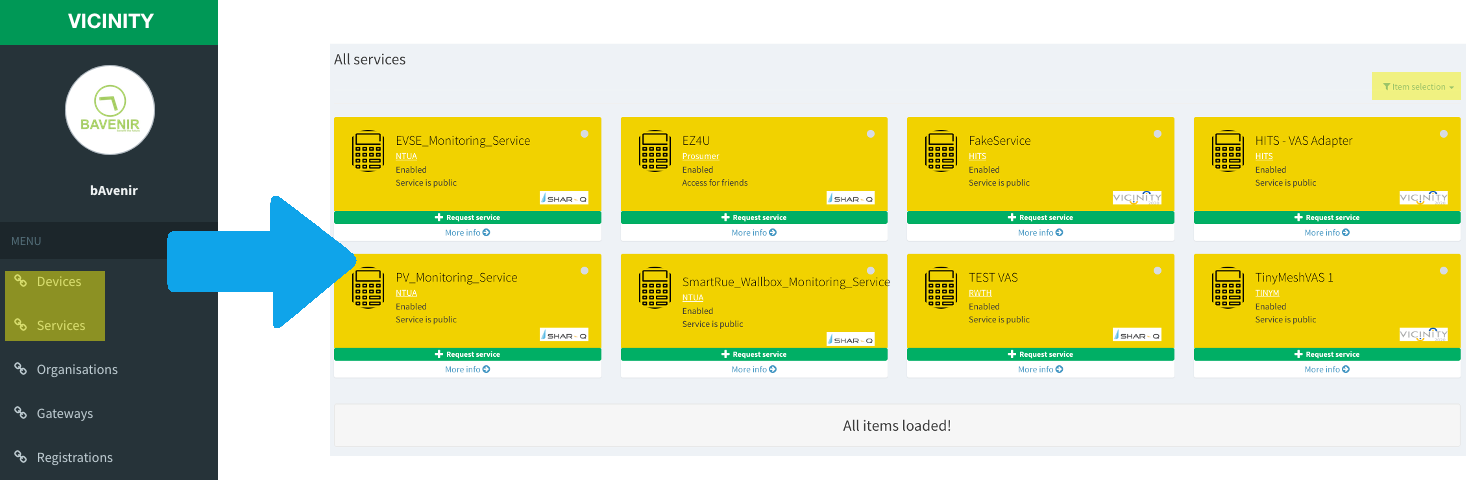
See the platform items In the sidebar menu, there are two tabs for the items: Devices (Orange widget) and services (Yellow widget). These views show your items, public items and items of your friends that are flagged as “visible for friends”. There are as well filtering options.
Each widget contains certain information about the item. We can see in the device widget a yellow-highlighted area with the item name and the organisation that owns the item. Right below there is a green-highligted are showing the status and visibility of the item. There is also an avatar on the top left corner and the logo type of adapter that has integrated the item on the right bottom corner. Finally, at the bottom there is a line with the owner of the item and a link to the profile.
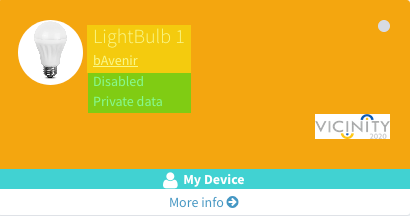
Device widget
In the service widget there is also a green action button in the case that the service is possible to request. Pressing +Request Service would initiate the contract process.
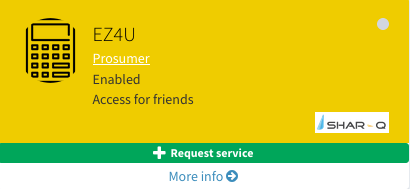
Service widget
Status & visibility
An item can go through several status and visibility levels, see the table below to understand some of the possible actions and effects in the item lifecycle.
| Action | Visibility | Status | hasGateway | hasOwner |
|---|---|---|---|---|
| Agent registers item in platform | Private | Disabled | YES | NO |
| User enables item | Private | Enabled | YES | YES |
| User makes item visible for friends | Visible for friends | Enabled | YES | YES |
| User makes item public | Public | Enabled | YES | YES |
| User disables item | Private | Disabled | YES | NO |
| User deletes item | N/A | Deleted | NO | NO |
Note
IMPORTANT: In order to assign a visibility level the device must be enabled. As well, it is important to remember that the visibility level of a device must remain lower than the visibility of its user owner.
Now we will see the all possible status and visibility levels and how to change them from the item profile.
- Status There are three possible status for an item:
- Disabled: When an item has just been registered, it appears as disabled in the platform. An item can be disabled by its owner anytime. Being disabled means that the item is private and is not visible in the P2P network. Furthermore a disabled item does not have owner assigned in the platform.
- Enabled: When a user claims an item, this turns to the enabled status. Now it is possible to change the visibility level and use it in contracts. It is possible to see the following changes in the “Disabled vs Enabled” picture.
- New section with visibility settings
- User owner of the item added
- Button to change user enabled
- New section with a button to remove the device
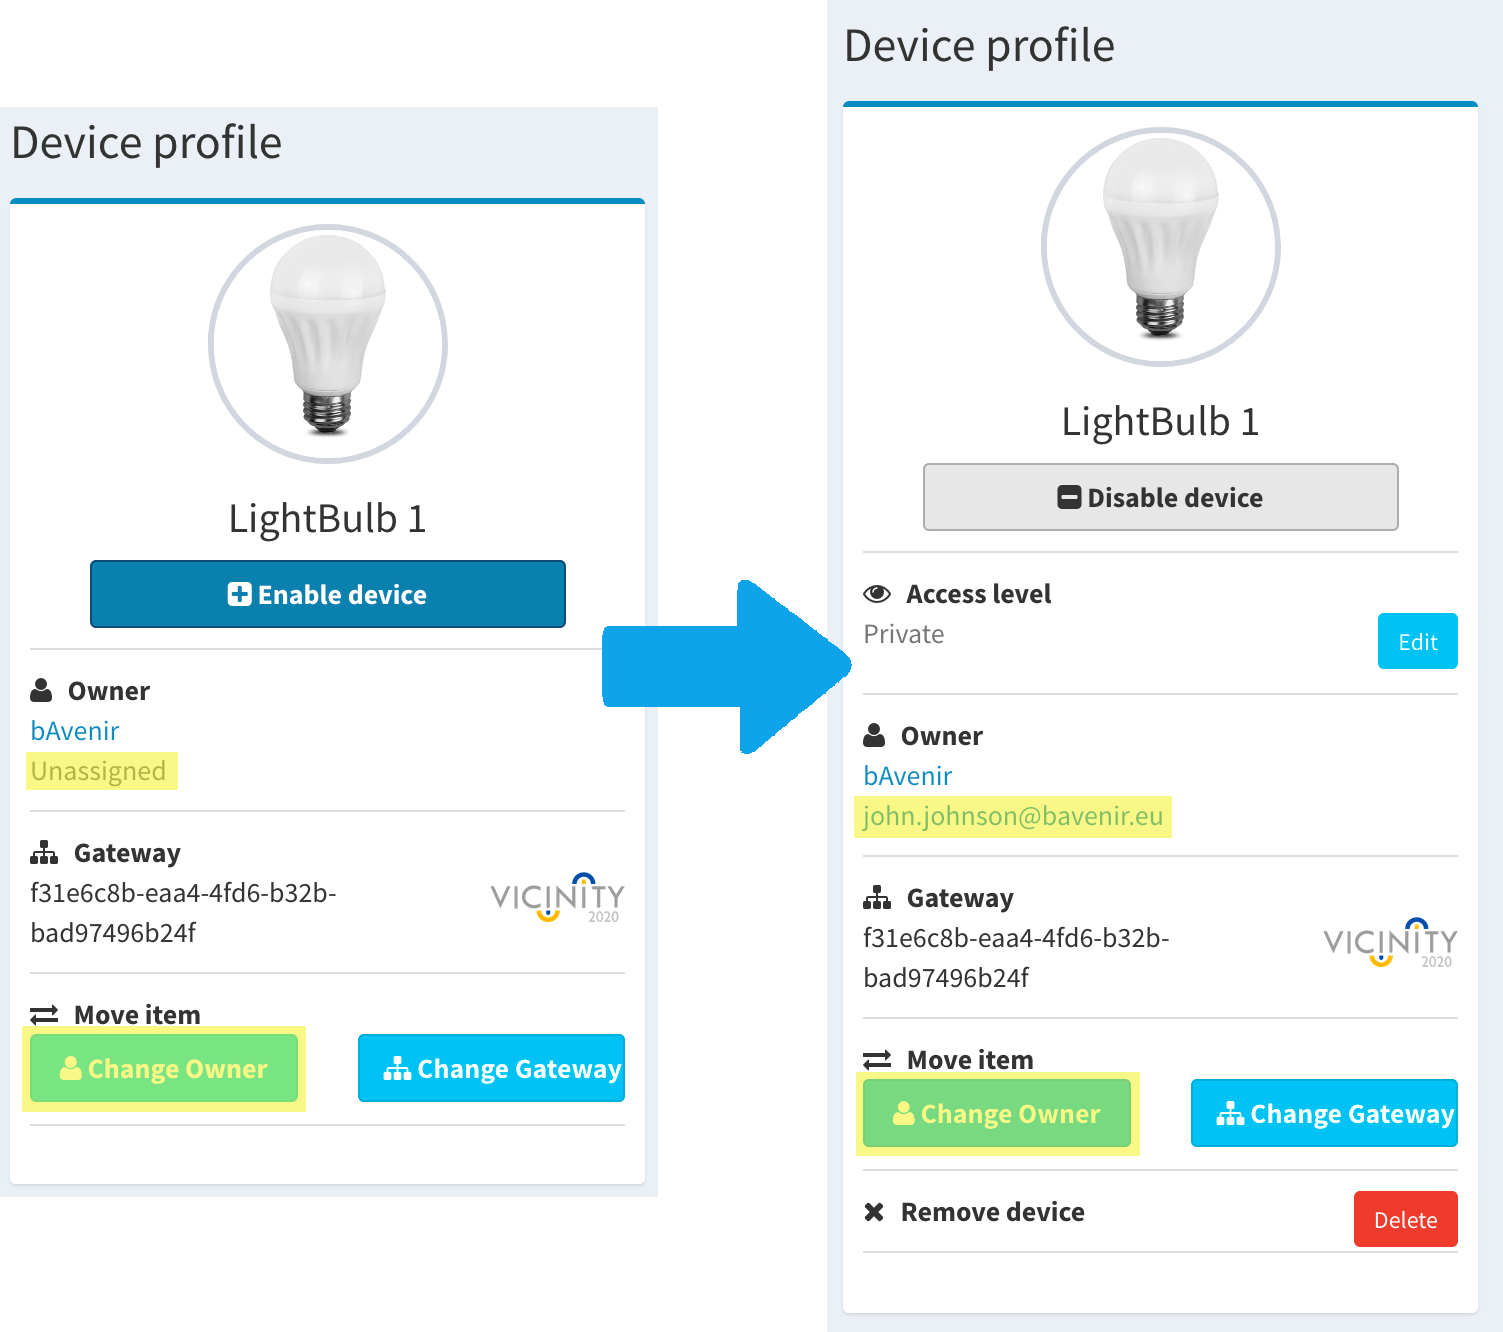
Disabled vs Enabled
- Deleted: The owner of the item can decide to remove it from the platform. This will remove the item from all existing contracts and it will make it no longer visible in the platform. This action can also be triggered using the agent.

- Visibility
There are also three visibility levels: * Private: Only my organisation can see the item. * Visible for friends: Other organisations that are partners with mine can see the item and request its data making use of a contract. * Public: All organisations can see the item and request its data making use of a contract.
To change the visibility go to the item profile and use the option highlighted. Remember to enable the device and set the visibility of your user adequately. See the process below:
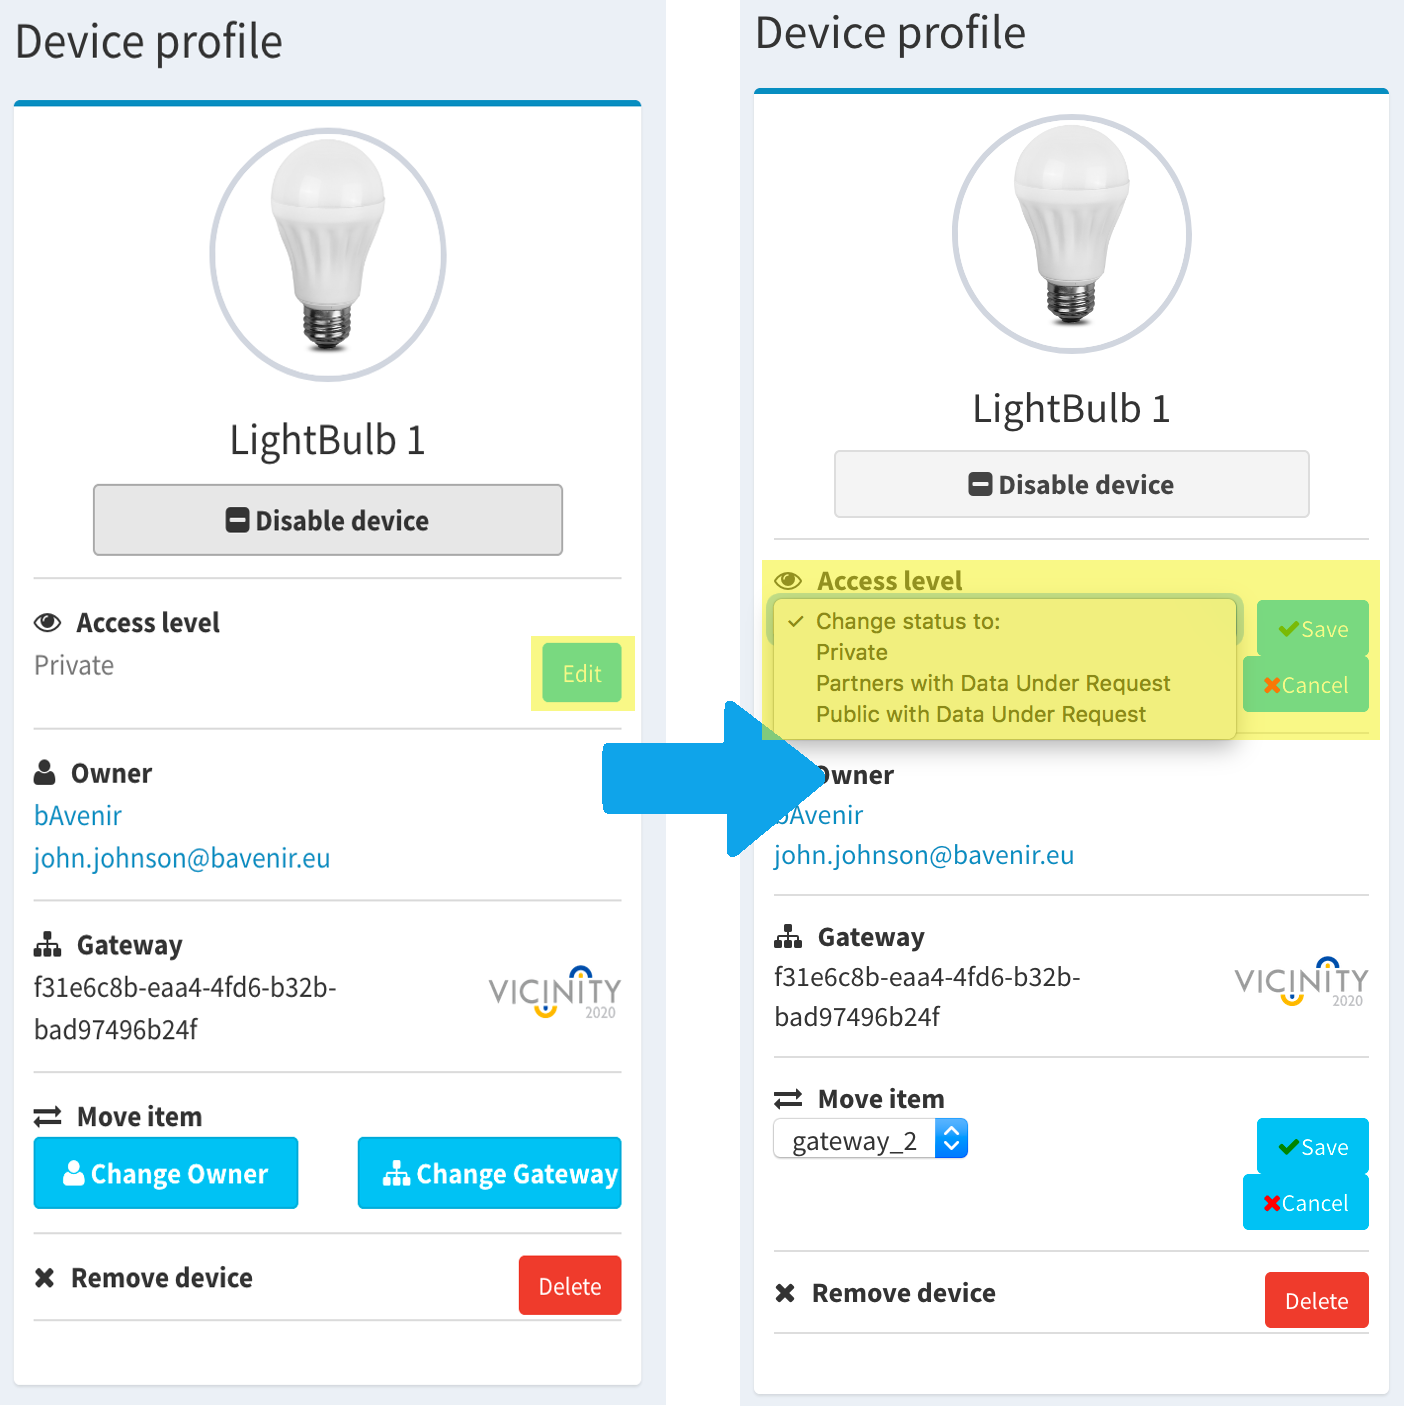
Move an item
It is possible to change the owner or gateway of an item without interfering existing contracts or doing any additional changes. For that it is necessary to be the current owner of the device or an organisation administrator. Nevertheless, there are some conditions that have to be met:
- Case of changing a gateway: New gateway needs to have the same type. I.e: Vicinity agent to Vicinity agent.
- Case of changing owner: New user need to have device owner or service provider role (Depending on the item you are moving). The privacy level of the item you are moving will be reduced if the new user has lower visibility, be aware that this can cause that your device will be removed from some contracts. *Check the visibility of the new user
to avoid issues.*
Moving an item can be specially useful in the situation of a leaving employee or change of responsibilities within an organisation. The status of the items under the responsibility of this person will remain unchanged, but we can have a different person in charge.
To move an item go to the item profile and select one of the options in the move item menu. When you click over change owner or change gateway, you will see a dropdown menu where you can select the desired option and finish the process by clicking save.
Note
Note that if the device is disabled you will only be able to change the gateway because there is no item owner at the moment.

Contracts
This section covers one of the last additions to the platform, the contracts. Through contracts is how devices and services of different organisations can share data and interact.
Currently there is only one contract type “Service Request”. In this type of contract, services and devices from organisation_one can request to use a service from organisation_two. This service will be monitoring (or monitoring and controlling) those items that were added to the contract by organisation_one.
In order to create a contract we need to follow these steps:
- A user with role Infrastructure Operator selects a service (public or from a partner organisation)
- Then the Infrastructure Operator needs to choose the contract settings:
- Select items (with fitting visibility) from his organisation. Can be from different users.
- Choose if we want to give write rights to the service or not.
- Approve the terms and conditions.
- A notification will be sent to the service owner.
- Once the service provider approves the contract, the service can start sharing data with the items belonging to the Infrastructure Operator, if he had any. All other items that belong to different users will not be part of the contract until their owners give consent.
- Therefore, the next step is to send a notification to all users so they can approve or reject the contract.
- In the end the contract is completed with the Infrastructure Operator, Service Provider and all other users that gave consent to share data.
- Any time a user can withdraw from the contract. In the subsequent points we will define the properties, relations and actions that the contract has got in order to fulfil its purpose.

Note
- Important notes:
- To request a service you need to be IoT operator.
- If the contract includes devices that belong to your organisation, but you are not the owner, then the respective owners will need to agree the contract. Meanwhile, these devices will appear as inactive or disabled, and will not be reachable by the service.
- All users with devices/services in the contract, will see the contract in their respective contracts view.
- The IoT operator and the service provider are considered administrators of the contract. They can cancel the contract anytime unilaterally. If a user that is not admin, presses the button to remove the contract, only itself and its devices will be removed. The contract will remain with the rest of the users.
- The items involved in the contract can be managed individually, but only by their owners.
Properties
In the table is possible to see the most relevant properties, for those which are possible to update there will be a separate sub-section in the last section of this page (“Manage”).
| Property | Description | Update |
|---|---|---|
| CTID | External ID | NO |
| IoT Owner* | Object with relevant info of the infrastructure owner | YES |
| Foreign IoT* | Object with relevant info of the service owner | YES |
| Status | Active or deleted | YES |
| R/W | Monitor or monitor & control | NO |
| T&C | Terms and conditions | YES |
| Type | Right now, only service request | NO |
- (*) IoT Owner and foreign IoT contain:
- Users with items involved in the contract;
- Information about the organisations the users belong to;
- Items in the contract with a flag stating whether they are active or not;
- Flag indicating if the terms and conditions were accepted. Only the IoT Provider and the Service Provider need to approve the T&C on behalf of the rest of users. However, each user can decide if its devices are included in the contract.
Relationships
Each item and user involved in a contract has information of it stored in an array of contracts.
| Property | Description | Update |
|---|---|---|
| CTID | External ID | NO |
| ID | Mongo ID | NO |
| imForeign | If true, user is service provider | NO |
| imAdmin | If true, user is IoT Operator (or Service Provider if ImForeign = TRUE) | NO |
| approved | Indicates whether the user has agreed T&C | YES |
| inactive | Array with user inactive devices | YES |
| readWrite | Contract with monitor or control capabilities | NO |
| contractingUser | ID of the administrator of the other side of the contract | NO |
| contractingParty | ID of the organisation of the other side of the contract | NO |
Main views
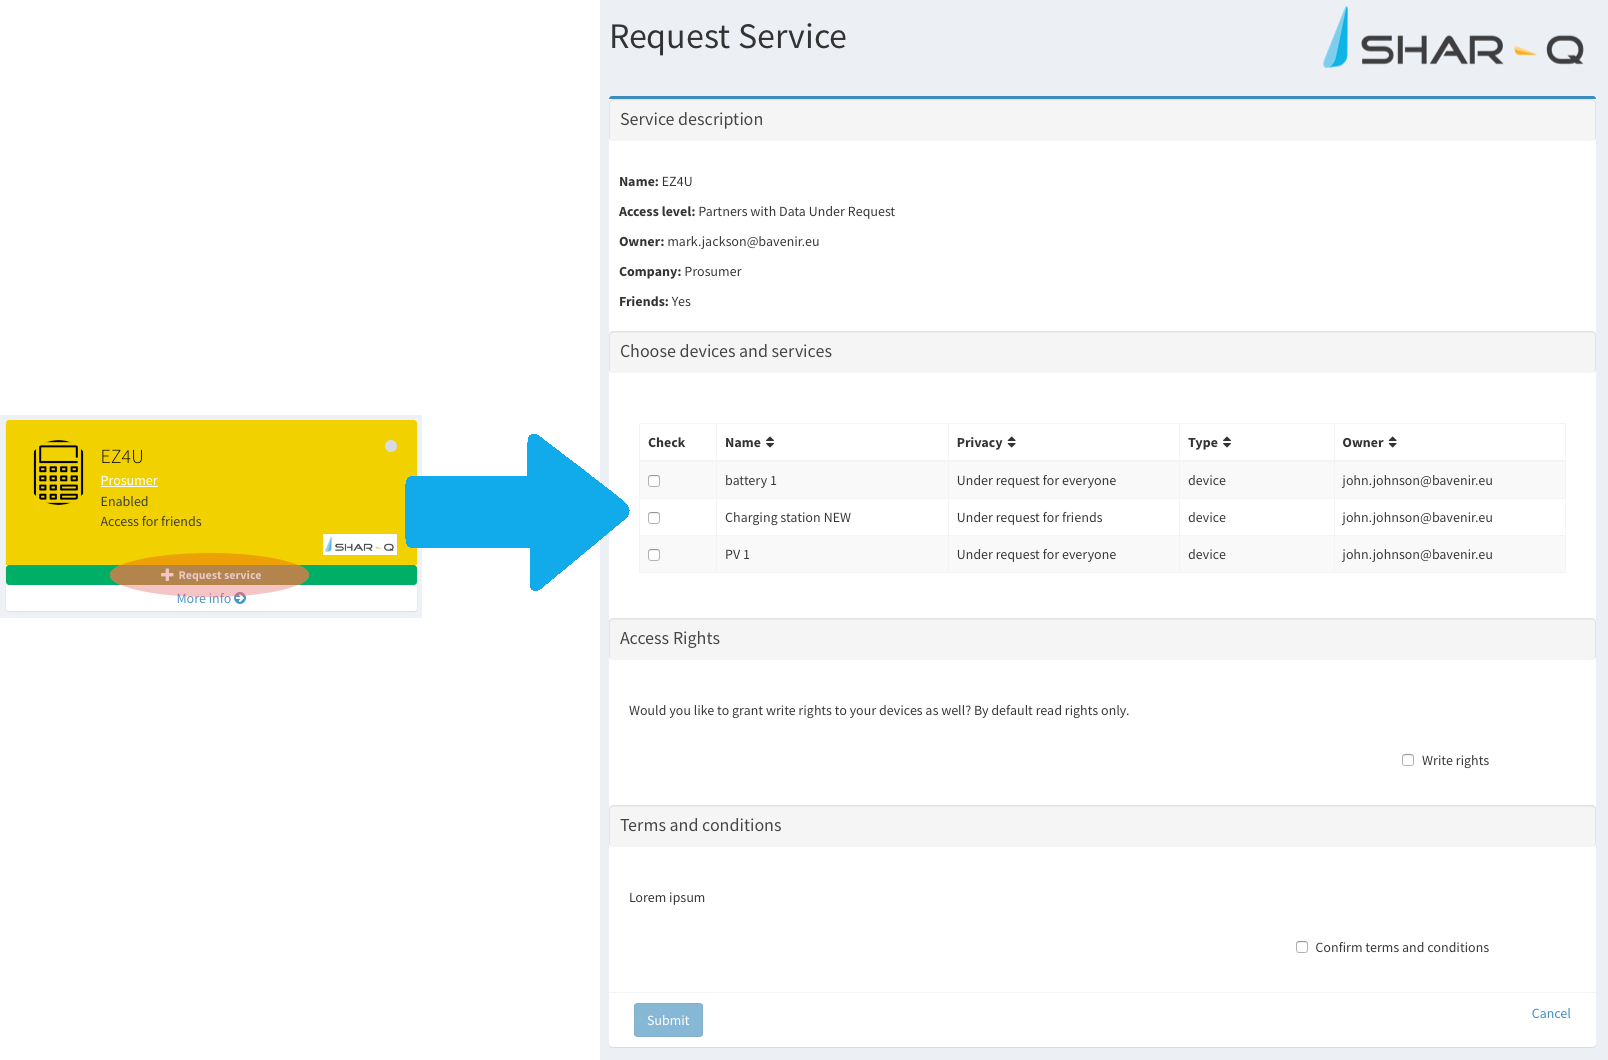
Request contract
To access this view a user with IoT Operator role needs to click on the “request service” button of any eligible service.
- Read the description of the service you are requesting.
- Select the devices/services you would like to include in the contract.
- Grant control or control&monitoring permissions to the service over your infrastructure.
- Read and accept the terms and conditions.

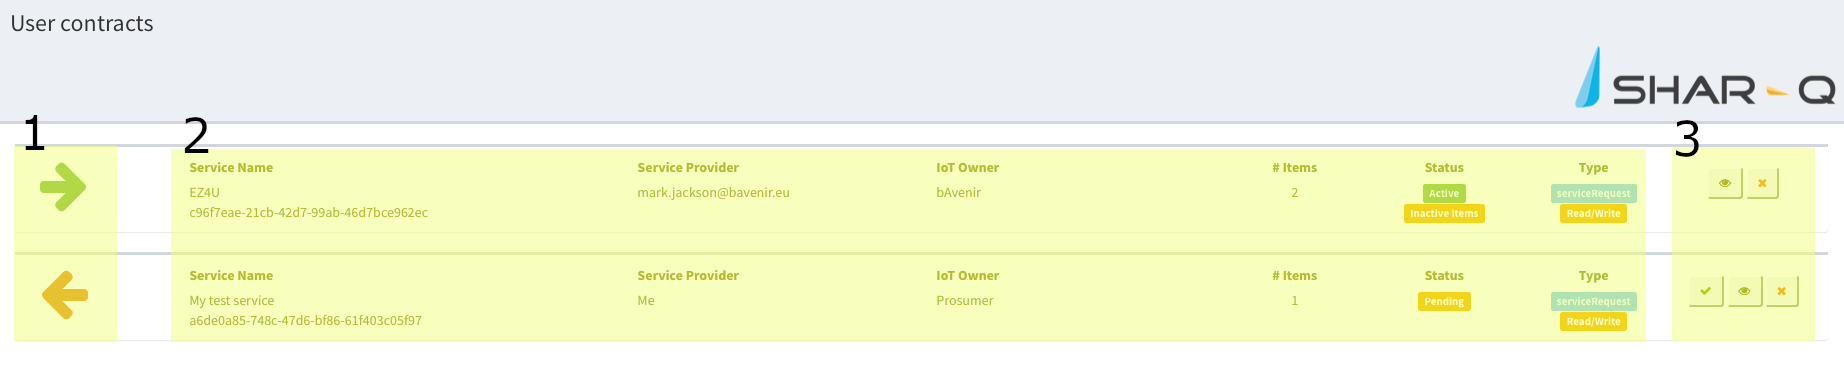
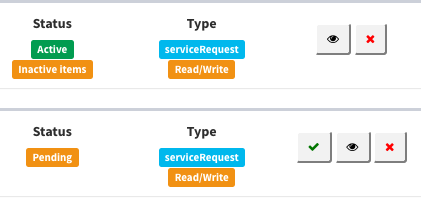
All contracts view
To access this view users with “device owner”, “service provider” or “IoT Operator” roles, just need to click on the sidebar the contracts link. 1. See if your organisation is providing (red flag) or using the service (green flag). 2. See some important information: Service name, service provider name, owner of the infrastructure, number of items in the infrastructure, status of the contract, and type and permissions. 3. Actions: Approve, see details and cancel contract.
Contract detail
To access this view users with “device owner”, “service provider” or “IoT Operator” roles, just need to click on the eye icon that you will find in each contract instance of the “all contracts view”. 1. Information of the service provider and service used. 2. Legal description of the contract. 3. Items info:
- Name, OID, type of item, owner, status and actions.
- Actions are affecting status of the items in the contract. It is possible to enable, disable and remove item from the contract.
4. Contract action buttons: * Transfer contract, accept contract, remove contract and close details.

Manage
Create a contract
- Select a service and click “Request service”. Do it from the services view or from a service profile.
- The “request service view” opens, there you can see all the information about the service you are requesting and select the items that you would like to share with it. Also it is possible to grant read or read/write permissions to the service over your devices.
- Once you agree the terms and conditions, it is possible to submit the contract request.
- Now the contract appears in the “all contracts view” (sidebar menu). The contract will be active once the service provider accepts the request.
- All parties should receive notifications with the status of the contract.
Accept, see or remove a contract
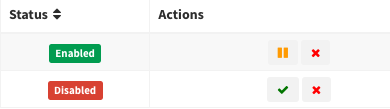
Within the “all contracts view” you have several actions for each contract.
- See details: Represented by an eye. Opens the “contract detail view”.
- Accept a contract: Green check sign.
- If you are an administrator: Accepts contract.
- If you are a normal user: Enables your devices in the contract.
- Remove contract: Red cross.
- If you are an administrator: Removes contract.
- If you are a normal user: Removes you and your items from the contract.
Transfer a contract It is possible to transfer the responsibility of being the administrator of a contract. To do so click in the exchange button in the “contract detail view” and select a suitable recipient for the responsibility. That would be some user with the IoT Operator role.

Enable, disable and remove devices within a contract Each item can be managed individually by its owner. To do so, navigate to the “contract detail view” and at the bottom you will see all the items. Only those which are your will have actions available.
Enabling (green check) and disabling (pause sign) keep the item in the contract. A disabled/inactive device cannot be reached by the service.
Removing (red cross) a device, deletes all links of the device with the contract. After removing the device it is not possible to enable it back.
Update items in the contract
A system integrator may update devices or services in the infrastructure, and these items might be involved in some contracts. This could be an issue, since the updated item might have new properties or actions that were not included in the terms of conditions of previously existing contracts. To cope with this problem, the update process modifies the contracts in the following manner:
- When updating a device:
- The device is put to disabled mode in all contracts.
- Contracts flag the device as inactive.
- The owner of the device is notified and then it is possible to revise the T&C and accept or reject them.
- If the device owner accepts the conditions the device will be added to the contract again, if not, will be permanently removed.
- When updating a service:
- The contract is moved to the state when all parties need to approve the T&C, it suffers a reset.
- The items included in the contract cannot communicate anymore, until their owners approve the new T&C. 3. All the users involved in the contract are notified, and once they approve the T&C, the contract is re-established.
Platform Evaluation
This section contains tools to evaluate the complexity of the platform.
Tests
There have been set up some tests to check some of the functionalities of the platform. There is a special focus on the API. We will see in this section how to run the tests.
Note
This functionality is available for the server only. (Navigate to the server root folder to execute the scripts that you will find below)
- Set up a test db
(In the section Platform deployment, there is more info regarding how to setup Mongo, create users or add authorisation to access databases)
- Create a clean mongo database. We will assume the name “nmapitest”.
- Authorize one user to make use of this database. We will assume user and password to be “test”.
- Insert a first user in “users” and organisation in “useraccounts” into the db “nmapitest”:
db.useraccounts.insert({ "avatar" : "", "location" : "SomeCountry", "cid" : "admin-test", "name" : "adminCorp", "businessId" : "1234-5678", "hasNotifications" : [], "knowsRequestsTo" : [], "knowsRequestsFrom" : [], "knows" : [], "status" : "active", "skinColor" : "blue" })db.users.insert({ "email" : "admin@admin.com", "occupation" : "Web Master", "avatar" : "", "name" : "admin", "authentication" : { "hash" : "$2a$10$EFuFLZGxhfgScAnR/.aj9Osnbw/4sTmHcW2guFesyIChSr8w/bSHC", "principalRoles" : [ "user", "administrator", "infrastructure operator", "service provider", "device owner", "system integrator", "devOps", "superUser" ] }, "accessLevel" : 2.0, "status" : "active" })
Then update them as follows. Remember to replace the id with ObjectId(” ID OF THE NEW ORGANISATION OR USER “) that you obtained in the previous step:
db.useraccounts.update(
  {cid: "admin-test"},
  {$set: {
       "accountOf" : [ {
        "id" : < OBTAINED WHEN INSERTING >,
        "extid" : "admin@admin.com"
       }
    ]}
  })
db.useraccounts.update( {email : "admin@admin.com"}, {$set: { "cid" : { "id" : < OBTAINED WHEN INSERTING >, "extid" : "admin-test" } } })
- Once the db is ready replace in the package JSON the script test with the following:
"test": "env=test VCNT_MNGR_DB=mongodb://test:test@ < YOUR IP or LOCALHOST > :27017/nmapitest nyc mocha './test/**/*.spec.js'"
- Finally, to run the test execute:
npm run test
Complexity
Measures the complexity of the code. It is based on the cyclomatic complexity of the functions among other measurements.
Note
This functionality is available for the server only. (Navigate to the server root folder to execute the scripts that you will find below)
Run at module level:
npm run complexity
Run at function level. Highlights the most complex functions per module:
npm run complexity-detail
F.A.Q
Frequent asked questions section
Find information about how to resolve common issues or use certain functionalities. This section can be updated with platform users feedback.
How can I recover my password?
It is not possible to send you your old password for security reasons, however we can help you reset your password following a series of simple steps:
- Navigate to the login page and click “recover password”

- Introduce your mail address and send the request for new password
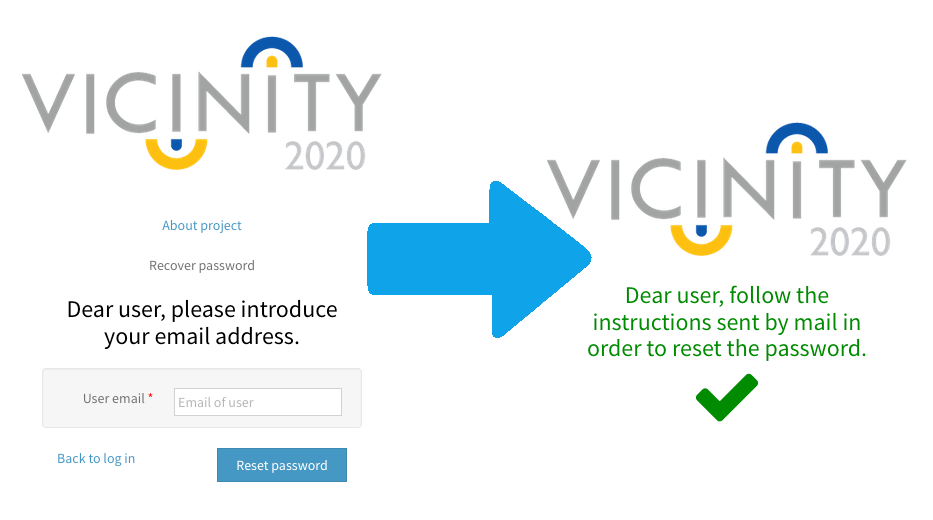
- Go to your mail and follow the link for changing your password

- Change the password and you are all set
How can I change my password?
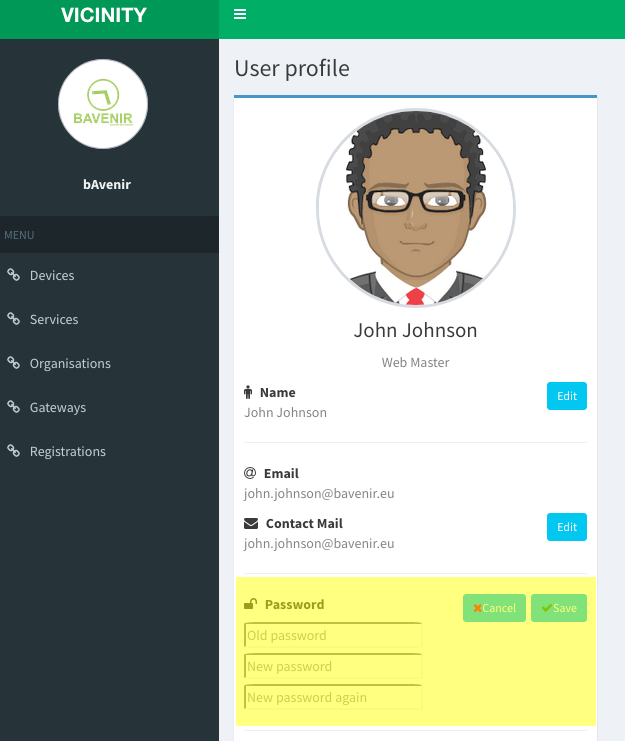
It is possible to change your password using the user interface. To do so, follow these steps:
- Navigate to the user profile
- Click on edit password
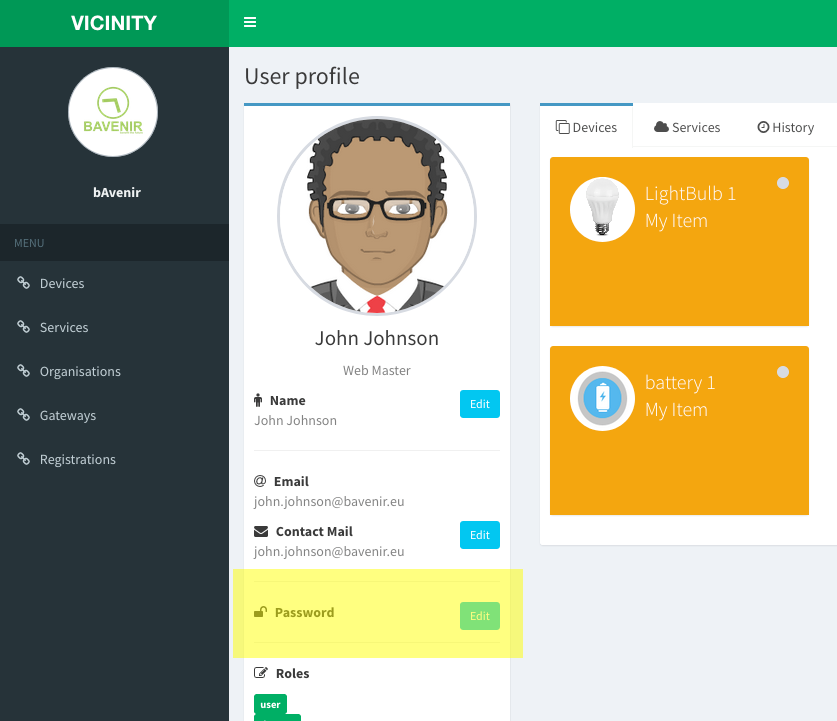
- Change and submit your new password.
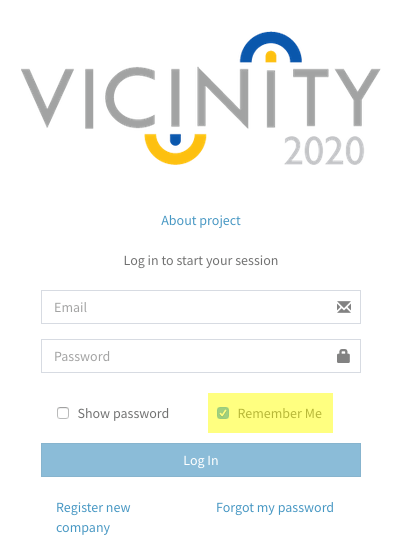
Can I keep a session open in my browser?
If you want to keep open your session and avoid typing your password every time, we can do that for you. Just check the box highlighted in the picture. Use this feature responsibly and preferably only in your personal computer to prevent unauthorised access to your account!
How can I use the platform REST API?
The platform offers a way to programatically use some of its functionalities. Thus developers can build their own value added services or user interfaces using the platform backend.
Everyone with a valid organisation registered can use the API and all the documentation is available following the link below: